Published by: Saif (May 2026) | Platform: Roblox | Game: Grow a Garden
If you just started Grow a Garden and you are staring at 20 Sheckles wondering what to do, this Grow a Garden farming guide is for you. And if you have been playing for weeks but feel like you are hitting a wall while other players are somehow earning billions per session, this guide is also for you.
Grow a Garden was created by Roblox and launched in March 2025. It became one of the fastest-growing games in Roblox history, peaking at 9.1 million concurrent players on May 24, 2025. The game has since expanded through major updates including the Pets update (1.04.0), the Summer Harvest event, the Prehistoric update, and the Mega Harvest event, each one adding new crops, mutations, and mechanics that reward players who understand the system.
The surface loop looks simple: buy seeds, plant them, harvest, sell, repeat. But underneath that is a deep system of mutation stacking, weather timing, sprinkler placement, pet synergies, and stage transitions that most players never fully understand. This guide walks you through every layer in the exact order you will need it, from your first Carrot seed to late-game Celestial-stacked Mint crops selling for hundreds of millions.
| What is the best farming strategy in Grow a Garden?
Start with Strawberries as your first multi-harvest crop, catch Blood Moon events for 4x Bloodlit mutations, upgrade to Master Sprinklers for passive mutation stacking, and switch to Mythical crops like Mint once you pass 500,000 Sheckles. Before making any major trade or seed investment, use the GAG Calculator to check current crop values. |
What Is Grow a Garden Farming Guide? The Core Farming Loop
In Grow a Garden we plant seeds, grow crops, and sell the harvest for Sheckles, the in-game currency. The more Sheckles you earn, the better your seeds, tools, and pets get. Those upgrades let you earn faster, which lets you upgrade further. That loop never really stops.
But here is what separates this game from a basic idle farmer: mutations. Every crop you grow has a chance to gain a mutation during a weather event, through a sprinkler, or through a pet ability. Mutations apply multipliers to your crop’s base value. A single Shocked mutation turns a crop worth 5,000 Sheckles into one worth 500,000. Two stacked mutations on a late-game crop can push that number into the hundreds of millions. Learn about Grow a Garden farming tips.
The five pillars of the game are:
- Seeds and crops: what you plant and why it matters which ones you choose
- Mutations: the multiplier system that is the real money engine
- Weather events: the triggers for the highest-value mutations
- Sprinklers and gear: your tools for making mutations happen more consistently
- Pets: passive ability bonuses that accelerate mutations and income
Every section of this guide builds on these five pillars. Once you understand how they connect, the game opens up completely.
The 7 Crop Tiers: What to Grow and When
Grow a Garden has over 100 crops organized into rarity tiers. The tier determines the crop’s base value range and how often it shows up in the Seed Shop. But tier alone does not tell you what to plant. Two other factors matter just as much: whether a crop is multi-harvest or single-harvest, and where you are in the game. See guide on all crops in Grow a Garden.
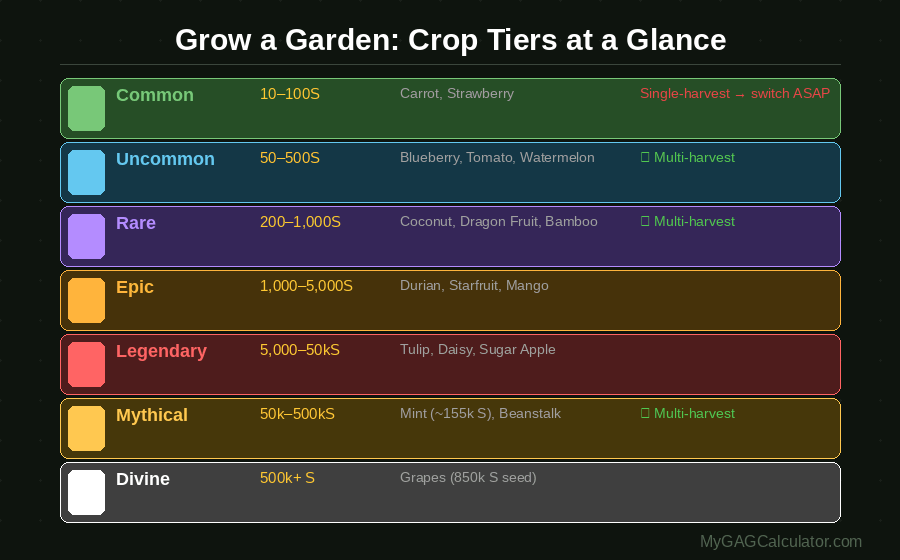
Multi-harvest crops produce fruit repeatedly without you needing to replant. Once a Strawberry bush is in the ground, it keeps giving you Strawberries indefinitely. Your investment compounds over time.
Single-harvest crops disappear after one pick. You have to buy a new seed, find a plot spot, and plant again every single cycle. At early stages this is fine. Past early game, single-harvest crops on good plots are a waste of compounding potential.
| PRO TIP: Crop Weight and Sell Price: One more factor that affects sell price is crop weight. Heavier crops sell for more Sheckles when you hand them off at Steven’s Stall. Mutations can alter crop size, and pets like the Toucan add a 60 percent size bonus to tropical crops, which translates directly into a higher sell price at harvest. When you are comparing two crops of the same tier, the heavier one is almost always the better sell. Use the Grow a Garden Weight Calculator to check weight-adjusted crop values before selling. |
| Tier | Base Value Range | Crop Examples |
|---|---|---|
| Common | 10 to 100 Sheckles | Carrot (10S seed), Strawberry (50S seed) |
| Uncommon | 50 to 500 Sheckles | Blueberry, Tomato (800S seed), Watermelon |
| Rare | 200 to 1,000 Sheckles | Coconut, Dragon Fruit, Bamboo (4,000S seed) |
| Epic | 1,000 to 5,000 Sheckles | Durian, Starfruit, Mango, Rose |
| Legendary | 5,000 to 50,000 Sheckles | Tulip, Daisy, Sugar Apple |
| Mythical | 50,000 to 500,000 Sheckles | Mint (~155,000S), Beanstalk, Moon Fruit |
| Divine | 500,000+ Sheckles | Grapes (850,000S seed), Celestial Bloom |
| Prismatic / Event | 1,000,000+ Sheckles | Candy Blossom, Octobloom, seasonal exclusives |
Best Crops by Farming Stage
This is the table most guides do not give you. Not just which crop is best, but the exact moment to switch based on your current Sheckle count. For a full personalised breakdown of which crops earn the most per hour given your plot count and time budget, use the Grow a Garden Crop Planner:
| Stage | Switch At | Best Crop | Why |
|---|---|---|---|
| Opening | 0 to 200S | Carrot | Fastest grow time, builds your first buffer |
| Early | 200S to 5,000S | Strawberry | Cheapest multi-harvest crop, compounds fast |
| Early-Mid | 5,000S to 50,000S | Tomato or Blueberry | Multi-harvest, no replanting, steady passive income |
| Mid | 50,000S to 500,000S | Bamboo + Dragon Fruit | High per-harvest value, accessible from shop |
| Late | 500,000S to 5M S | Mint | ~155,000S base, earnable free via Gardener Pack |
| Late | 500,000S to 5M S | Dragon Pepper | Excellent value-to-time ratio, multi-harvest |
| End-game | 5,000,000S and beyond | Candy Blossom or Candy Sunflower | Highest base values, mutation multipliers hit hardest here |
| Tip: You do not have to make a clean switch. Many experienced players keep two or three Tomato plots running for daily quest completions while their main plots run Mythical crops. The space under large trees works perfectly for lower-tier crops that complete quest objectives without wasting prime growing spots. |
Sheckles Per Minute: The ROI Every Farmer Needs to Know
Base value is not the number that should drive your planting decisions. Sheckles per minute is.
A crop that is worth 10,000 Sheckles but takes 60 minutes to grow earns you 167 Sheckles per minute. A crop worth 3,000 Sheckles that takes 8 minutes earns you 375 Sheckles per minute. The second crop is more than twice as efficient, even though it looks weaker on a value chart.
Here is a reference breakdown of key crops across stages:
| Crop | Seed Cost | Approx. Grow Time | Base Harvest Value | Est. Sheckles / Min |
|---|---|---|---|---|
| Carrot | 10S | 1 to 2 min | 15 to 25S | ~12 to 20 S/min |
| Strawberry | 50S | 3 to 5 min | 80 to 120S (multi) | ~20 to 30 S/min |
| Blueberry | ~100S | 5 to 8 min | 150 to 250S (multi) | ~25 to 40 S/min |
| Tomato | 800S | 8 to 12 min | 500 to 900S (multi) | ~50 to 80 S/min |
| Bamboo | 4,000S | 10 to 15 min | 1,500 to 3,000S | ~120 to 200 S/min |
| Dragon Fruit | ~8,000S | 15 to 25 min | 4,000 to 8,000S | ~200 to 350 S/min |
| Mint | Gardener Pack | 20 to 35 min | ~155,000S | ~4,400 to 7,700 S/min |
| NOTE: Grow times and values shift with weekly game updates. For the most current crop values, run your crops through the GAG Profit Calculator before making major planting decisions. |
The Mint number is why experienced players grind out the Gardener Seed Pack as a top priority. Once Mint is in your rotation, your passive income per minute jumps by an order of magnitude compared to mid-tier crops.
The Mutation System: How Value Multiplies (Including the Math)
Mutations are the most important mechanic in Grow a Garden by a wide margin. A mutation applies a multiplier to your crop’s base sell value. Some mutations give 2x. The rarest ones push 365x. And they stack.
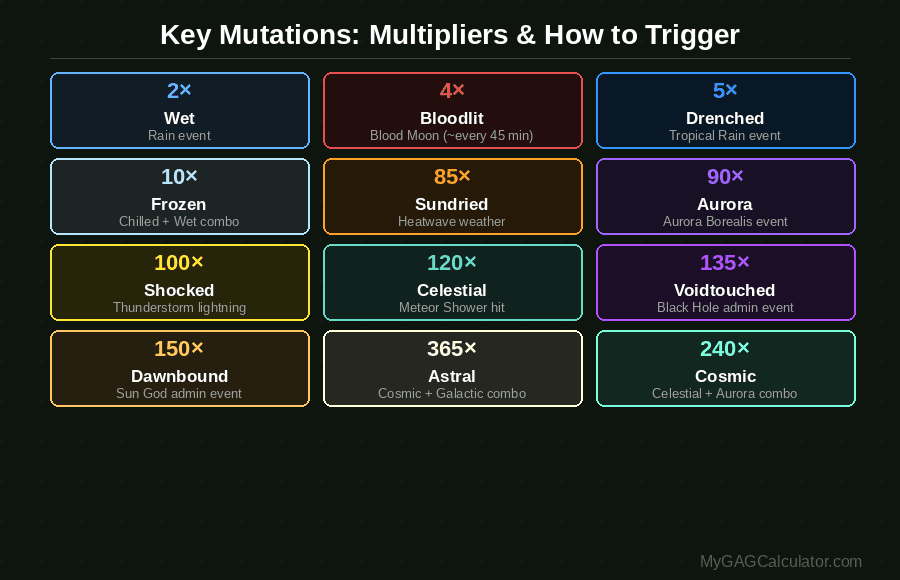
Here is the full mutation reference table:
| Mutation | Multiplier | Primary Trigger |
|---|---|---|
| Wet | 2x | Rain event |
| Windstruck | 2x | Windy or Gale weather |
| Chilled | 2x | Frost weather |
| Moonlit | 2x | Night event (hourly) |
| Drenched | 5x | Tropical Rain event |
| Honey Glazed | 5x | Honey Sprinkler |
| Pollinated | 3x | Bee Swarm event or Queen Bee pet |
| Frozen | 10x | Frost weather (requires Wet + Chilled combo) |
| Golden | 20x | ~1% random chance, Dragonfly pet |
| Molten | 25x to 50x | Volcano event |
| Ceramic | ~50x (VERIFY) | Specific weather or sprinkler conditions – verify in-game |
| Rainbow | 50x | ~0.1% random chance, Butterfly pet |
| Sundried | 85x | Heatwave weather |
| Aurora | 90x | Aurora Borealis event |
| Shocked | 100x | Thunderstorm lightning strike |
| Celestial | 120x | Meteor Shower direct hit |
| Meteoric | 125x | Meteor Shower variant |
| Voidtouched | 135x | Black Hole admin event |
| Dawnbound | 150x | Sun God admin event |
| Cosmic | 240x | Celestial and Aurora combination |
| Galactic | 120x | The Space Travel weather event, which is admin-triggered |
| Plasma | 5x | The Jandel Lazer Event |
| Radioactive | 80x | The Radioactive Carrot event |
| Astral | 365x | Cosmic and Galactic combo, highest in game |
Mutation Stacking: The Compounding Formula Most Players Get Wrong
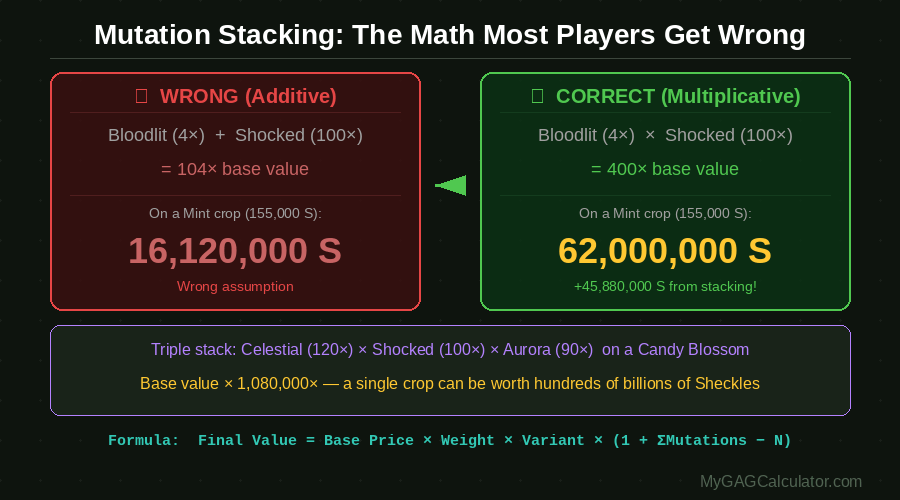
This is where the real money comes from, and almost no guide explains it properly.
When a crop has multiple mutations, the game does not add the multipliers together. It multiplies them against each other.
Wrong assumption (additive): Bloodlit (4x) plus Shocked (100x) = 104x base value
What actually happens (multiplicative): Bloodlit (4x) times Shocked (100x) = 400x base value
On a Mint crop with a base value of 155,000 Sheckles:
- Additive assumption: 155,000 x 104 = 16,120,000 Sheckles
- Multiplicative reality: 155,000 x 400 = 62,000,000 Sheckles
The difference is 46 million Sheckles on a single crop. That is the compounding gap. And it only gets more extreme as you add a third or fourth mutation. A triple-stacked Celestial (120x) plus Shocked (100x) plus Aurora (90x) on a Candy Blossom is not a theoretical number. Players hit those regularly in late-game sessions. Before you commit any high-value crop to a multi-mutation strategy, use the Grow a Garden Mutation Calculator to see your exact stacked Sheckle value in real time.
Pre-Event Mutation Checklist: Do This Before Every Major Weather Event
- Your highest-value crops are fully planted and mature before the event starts
- Seeds planted mid-event may not qualify for the full mutation, so plant early
- Your sprinklers are active and positioned to hit your best plots
- You are online and in the game, not just logged in at the title screen
- Your best pets with mutation-boosting abilities are active
- You are in a private server if you have high-value crops you cannot afford to lose to theft
Weather Events: Your Mutation Calendar
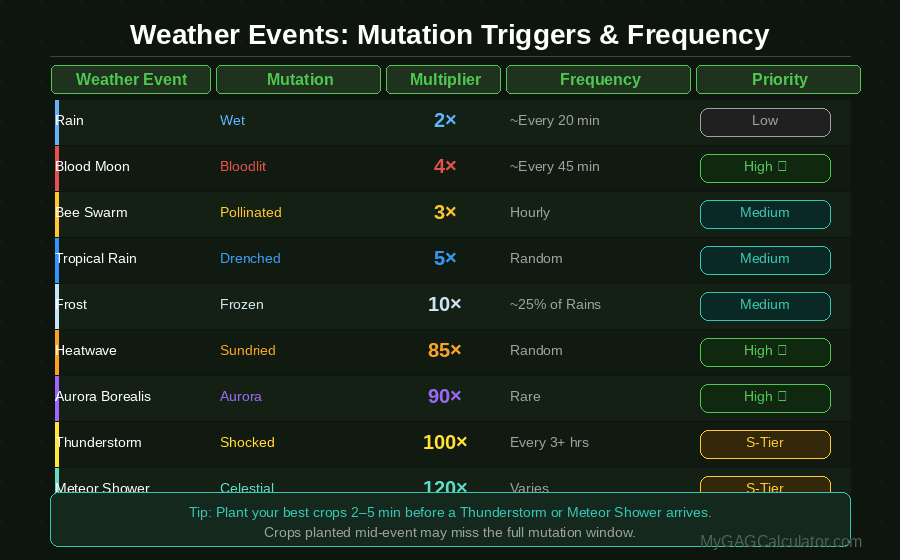
Weather events are random server-wide triggers that give your crops mutations. You cannot force them, but you can prepare for them. Get detailed guide on Grow a Garden weather events. Here is the full reference:
| Weather Event | Mutation | Multiplier | Growth Boost | Approx. Frequency |
|---|---|---|---|---|
| Rain | Wet | 2x | +50% | Every 20 minutes roughly |
| Tropical Rain | Drenched | 5x | +50% | Random |
| Frost | Chilled or Frozen | 2x or 10x | +50% | Replaces Rain ~25% of the time |
| Night | Moonlit | 2x | Normal | Every hour |
| Blood Moon | Bloodlit | 4x | Normal | 33% of nights (~every 45 to 60 min) |
| Thunderstorm | Shocked | 100x | +50% | Every 3 or more hours |
| Heatwave | Sundried | 85x | Normal | Random |
| Meteor Shower | Celestial / Meteoric | 120x or 125x | Normal | Varies |
| Aurora Borealis | Aurora | 90x | +50% | Rare |
| Bee Swarm | Pollinated | 3x | Normal | Hourly with a 10-minute active window |
| Volcano | Molten | 50 to 60x | Variable | Random and rare |
| Windy / Gale | Windstruck | 2x | Varies | Occasional |
| Snow | None | None | None | Rare |
| Sandstorm | Sandy | 3.894x | None | Random |
Admin events: Events like Sun God (Dawnbound, 150x), Black Hole (Voidtouched, 135x), and DJ Sam are triggered by game developers, not by regular game logic. They give the highest multipliers in the game but are completely unpredictable. Treat them as a bonus if they happen while you are playing, not as something to plan around.
How to Read the Weather Indicator and Time Your Planting
The in-game weather indicator sits in your HUD and shows the current and upcoming weather state. Once you see a Thunderstorm icon approaching, you have a short window before it hits. You can also use our Grow a Garden Weather Tracker to see live weather conditions and plan ahead.
The correct planting strategy is to plant your best crops before the event reaches your garden, not during. Crops planted while the weather event is already active may not capture the full mutation. The ideal window is 2 to 5 minutes before the event arrives.
For Blood Moon specifically: it happens on roughly one out of every three nights, which means roughly every 45 to 60 minutes of play. This is the most reliable high-value mutation trigger available without admin intervention. Make it your anchor event for consistent late-night farming sessions.
| Bee Swarm tip: The Bee Swarm event has a 10-minute active window and runs roughly every hour. Unlike Thunderstorms which are random and infrequent, Bee Swarm is one of the most consistent mutation sources in the game for players who cannot rely on catching the rarer events. The Pollinated mutation at 3x is not the biggest multiplier, but its reliability makes it worth building around during early and mid-game. |
Sprinklers: Passive Mutations While You Sleep
Sprinklers are your primary tool for passive income and mutation generation. They automatically water your crops, which accelerates growth speed and increases the chance of mutations triggering even when you are not watching.
Here is the sprinkler tier breakdown:
| Sprinkler | Approx. Cost | Plot Coverage | Mutation Rate Boost | Best Use Case |
|---|---|---|---|---|
| Basic Sprinkler | Low (Gear Shop) | 1 to 2 plots | Low | Early game, get it first |
| Advanced Sprinkler | Mid (Gear Shop) | 2 to 3 plots | Medium | Mid-game upgrade |
| Honey Sprinkler | Mid (Gear Shop) | 2 to 3 plots | Medium | Triggers Honey Glazed mutation (5x) |
| Master Sprinkler | High (Gear Shop) | 3 to 5 plots | High | Late-game mutation farming |
| Godly Sprinkler | Very High or Event reward | Wide range | Very High | End-game passive setup |
Offline Farming Setup: What to Do Before You Log Off
Mutations do not happen offline, but growth does. Here is the correct offline farming configuration:
- Step 1: Plant your highest-value multi-harvest crops on all available plots. Multi-harvest crops like Strawberry, Tomato, and Mint keep producing without replanting, so you collect everything that matured while you were away.
- Step 2: Place your best sprinklers to cover the most plots possible. Sprinkler coverage matters even for offline sessions.
- Step 3: Use a private server. This prevents other players’ Raccoon pets from stealing your mature crops while you are away.
- Step 4: Do not leave mature crops sitting unharvested for too long in a public server. Harvested plots are cleaner and safer.
- Step 5: If you have the Favorite Tool (20,000,000 Sheckles from the Gear Shop), mark your highest-value crops before logging off to prevent them from being collected by other players.
Plot Layout: Where to Place Sprinklers
The most efficient layout places your sprinkler in the center of a 3×3 crop cluster so it covers the maximum number of plots. If you have multiple sprinklers, offset them so their coverage zones overlap on your highest-value crops, not on empty space.
Bamboo placed at the edges of your farm serves double duty: it acts as a single-harvest high-value crop AND gives you a climbing structure to reach fruits growing on tall trees that would otherwise be hard to harvest.
Gear Purchase Priority Order: What to Buy First
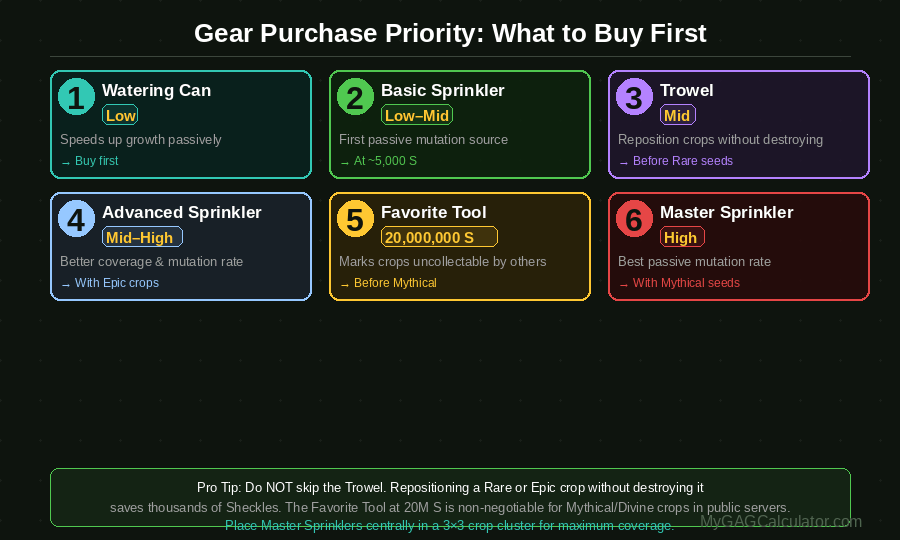
This is one of the biggest knowledge gaps in existing guides. Everyone says buy sprinklers but nobody tells you what to buy first when you have limited Sheckles. Here is the recommended order:
| Priority | Item | Approx. Cost | Function | Buy At This Stage |
|---|---|---|---|---|
| 1 | Watering Can | Low | Speeds up growth passively | As soon as you can afford it |
| 2 | Basic Sprinkler | Low to Mid | First passive mutation source | Once you hit ~5,000S with stable multi-harvest crops |
| 3 | Trowel | Mid | Reposition crops without destroying them | Before placing Rare or Epic seeds |
| 4 | Advanced Sprinkler | Mid to High | Better coverage and mutation rate | Once your main plots are Rare or Epic crops |
| 5 | Favorite Tool | 20,000,000S | Marks your crops as uncollectable by other players | Before placing Mythical or Divine crops in a public server |
| 6 | Master Sprinkler | High | Best passive mutation rate in regular play | When your plots are running Mythical seeds |
| Do not skip the Trowel early. It feels like an optional tool but it saves you a huge amount of Sheckles when you need to rearrange crops without destroying a mature high-value plant. |
Pets: Which to Target and How to Stack Them
Pets were added in Update 1.04.0 and changed the game significantly. Each pet provides a passive ability that affects your garden continuously. Some boost growth speed. Some increase mutation rates. Some actively find seeds or generate bonus income.
S-Tier Pets Worth Targeting First
| Pet | Ability | How to Obtain |
|---|---|---|
| Sea Turtle | Significant mutation rate boost | Summer Rare Egg |
| Dragonfly | Triggers Golden mutation (~20x) passively | Pet Eggs or shop |
| Queen Bee | Triggers Pollinated mutation (3x) on your crops | Bee-related eggs or Bee Swarm events |
| Butterfly | Increases chance of Rainbow mutation (50x) | Pet Eggs |
| Flamingo | ~15x growth boost every few minutes | Summer Rare Egg (~6.66% from Summer Harvest event) |
| Toucan | Enlarges tropical crops by +60% size, boosting sell price | Summer Rare Egg |
| Raccoon | Can steal crops from other players in public servers | Available in pet shop |
Oasis Egg Pets
The Oasis Egg is a separate egg type that drops a different set of pets compared to the Summer Rare Egg. Get guide on Grow a Garden eggs. Key Oasis pets include:
| Pet | Ability | How to Obtain |
|---|---|---|
| Fennec Fox |
Sly
Every ~18:30 min, visits a random player’s fruit and has an 18–36% chance to copy one of its mutations, then applies it to a random fruit you own that doesn’t already have it. Higher-multiplier mutations are harder to copy. Cannot apply to favorited plants.
|
Oasis Egg |
| Hyacinth Macaw |
Cloudtouched Bird
Every ~8:06 min, has a 15%+ chance to apply the Cloudtouched mutation to a nearby fruit you own. Only pet in the game that can apply the Cloudtouched mutation.
|
Oasis Egg |
| Sand Snake |
Coiled Commerce
When buying from the seed or gear shop, grants a 1.31–6% chance to duplicate the purchased item for free. Up to 48% cumulative duplication cap when stacking multiple Sand Snakes.
|
Oasis Egg |
Other Notable Pets
| Pet | Ability | How to Obtain |
|---|---|---|
| Black Bunny | Passively consumes nearby Carrot crops (can interfere with Carrot farming) | Common pet sources |
| Sea Otter | Drops extra seeds occasionally | Pet Eggs / event sources |
| Dog | Passive income or bonus on harvest (verify exact ability) | Early pet sources |
Pet Synergy Combinations
Pets stack their effects on the same crop. Combining pets that trigger different mutation types on the same plant means a single crop can accumulate multiple multipliers simultaneously.
| PET SYNERGY EXAMPLES
High-value combination 1: Dragonfly (Golden, 20x) plus Butterfly (Rainbow, 50x) If both trigger on a Mint crop: 155,000 x 20 x 50 = 155,000,000 Sheckles from a single harvest High-value combination 2: Queen Bee (Pollinated, 3x) plus Dragonfly (Golden, 20x) during a Blood Moon (Bloodlit, 4x) Three stacked mutations triggered partly by pets, partly by event. This is exactly the kind of combination that produces billion-Sheckle harvests in late game. |
The key rule: you need to be online during a weather event for the event mutation to stack on top of your pet-triggered mutations. Pets work during offline growth phases, but weather mutations only land if you are in the game when the event hits. To check pet values, egg odds, and tier rankings before hatching or trading, use the GAG Pet Calculator at MyGAGCalculator.com.
NPCs: Who They Are and When to Visit
No other major guide gives you a proper NPC reference. Here is the full roster:
| NPC | Location | What They Offer | Best Time to Visit |
|---|---|---|---|
| Tom (Seed Shop) | Near the main farm area | All seeds Common to Divine, stock refreshes every 3 to 5 minutes | Every 3 to 5 min for rare seed restocks |
| Steven (Sell Stall) | Main trading area | Sells your harvested crops for Sheckles | After every harvest, before trading |
| Eloise (Daily Quests) | Quest area | Daily quests that reward seed packs | Every day, first thing when you log in |
| Raphael (Pet Eggs) | Next to Gear Shop | Pet Eggs including Rare Summer Eggs (~17% spawn chance) | When you have 25,000,000S or 89 Robux ready |
| Travelling Merchant | Rotates through the map | Limited seeds, gear, cosmetics, rare eggs – 30-minute stock window | Every 4 hours, do not miss the window |
| Travelling Merchant tip: The merchant appears every 4 hours and carries items that are not always available through regular shops. If you see a seed or egg you want, buy it immediately. The 30-minute stock window goes fast, especially in public servers. |
Daily Quests: The Free Path to Mythical Seeds
Eloise’s daily quests are the single best free progression system in the game for players who cannot afford Mythical seeds from the shop. After completing 7 consecutive daily quests, you unlock the Gardener Seed Pack permanently. The Gardener Seed Pack has a 22% chance of giving you a Mint seed. Mint has a base value of roughly 155,000 Sheckles. That single seed, accessible completely free via quests, is worth more than most mid-game players earn in a full hour of active farming.
Here is how to optimize the 7-day unlock path:
- Days 1 and 2: Make sure your farm has at least 2 plots running Common crops (Carrot, Lettuce) for quest objectives alongside your main income crops.
- Days 3 to 5: If quests ask for Uncommon crops (Tomato, Blueberry), these should already be in your rotation by mid-game. No replanting needed.
- Days 6 and 7: Push through even if the quest feels inefficient. The unlock is permanent after day 7, so the cost of one week of quest completion pays dividends for the rest of your playtime.
After unlocking the Gardener Pack, open one daily. The 22% Mint chance is the best free-to-play progression tool in the game.
Private Server vs. Public Server: When to Use Each
| Situation | Use Public Server | Use Private Server |
|---|---|---|
| Just starting out, no valuable crops | Yes | Not needed |
| Running Common to Uncommon crops | Yes | Optional |
| Growing Rare or higher crops | No | Yes |
| AFK overnight farming | No | Yes, always |
| Mutation farming during weather events | No | Yes |
| You have Mythical or Divine crops planted | No | Yes, always |
| You have the Favorite Tool and high-value crops | Possible | Still recommended |
Setting up a private server is free or costs a small amount of Robux depending on your account. For any session where your crops could be worth millions, the private server is non-negotiable. Raccoon pets held by other players can steal your mature crops in public servers. One stolen Shocked Mint crop is worth more than most players spend on a private server for a full month.
Selling vs. Trading: When to Hold and When to Cash Out
Steven’s Sell Stall gives you a fixed price based on your crop’s current base value plus mutation multipliers. It is instant, reliable, and always available. Player-to-player trading gives you the possibility of getting more, but it also opens you up to scams and undervalued trades.
When to Sell at Steven’s Stall
- Any crop under the Epic tier
- Any crop that has a low-value mutation (Wet, Moonlit, Chilled)
- When you need Sheckles immediately to buy gear or seeds
When to Consider Trading
- High-tier crops (Mythical, Divine) with high-value mutations (Shocked, Celestial, Aurora)
- Pets you no longer need that have strong market demand
- Event-exclusive seeds during active events when demand is high
| Before any trade, always check the value. Use the GAG Trade Calculator to get the current market value of your crop or pet before accepting any offer. Scammers specifically target players who cannot quickly verify what their item is actually worth. The gap between what a scammer offers and the real value can be hundreds of millions of Sheckles on a high-tier mutated crop. |
Red Flags in a Trade
- Another player rushing you to accept quickly
- An offer that involves multiple low-value items instead of equivalent Sheckles or a direct crop swap
- Any player telling you their offer is the best you will find without showing their own value reference
- Trades involving crops or pets you have not verified the value of before the conversation started
Common Farming Mistakes That Cost You Millions
| MISTAKE 1
Leaving the game during weather events: There is no exception to this rule. You cannot receive mutations offline. If you see a Thunderstorm coming and you leave the game, every crop on your farm misses a potential 100x multiplier. If you cannot stay, at least get your best crops planted and your sprinklers active before you go. |
| MISTAKE 2
Staying on single-harvest crops past early game: Once you can afford Strawberries, every Carrot plot is a wasted compounding slot. Once you can afford Tomatoes, every Strawberry plot holding a non-quest crop is an opportunity cost. The shift from single-harvest to multi-harvest thinking is the single biggest income unlock in the game. |
| MISTAKE 3
Selling mutated crops without checking value: A player who does not recognize a Shocked mutation on their Bamboo plant might sell it at Steven’s for a few million Sheckles when a player trader would pay 10 times that. Always pause before selling anything with a glow effect or unusual appearance. |
| MISTAKE 4
Skipping daily quests: Seven days is one week. The Gardener Seed Pack’s 22% Mint drop changes your entire income trajectory. Players who skip quests because individual rewards seem small are paying a massive long-term cost. |
| MISTAKE 5
Buying rare single-harvest seeds on impulse: A 500,000 Sheckle single-harvest seed gives you one return. The same 500,000 Sheckles invested in a Mythical multi-harvest crop keeps producing indefinitely. Always check the multi-harvest status before buying any expensive seed. |
| MISTAKE 6
Ignoring the Travelling Merchant: The merchant appears every 4 hours and carries items you cannot always get elsewhere. Missing consecutive merchant visits means missing rare eggs and limited seeds that could jump your farm quality significantly. |
Frequently Asked Questions
Can you get mutations while offline in Grow a Garden?
No. Mutations from weather events require you to be actively in the game when the event occurs. Your crops still grow while offline, but they will not receive Shocked, Celestial, Aurora, or any other weather-triggered mutation unless you are online when the event hits.
How often does the Seed Shop restock in Grow a Garden?
The Seed Shop stock refreshes every 3 to 5 minutes. Each refresh gives you a new random selection of seeds at varying rarity levels. Higher rarity seeds appear less frequently. Visiting every few minutes is the best way to catch rare restocks.
What is the highest mutation multiplier in Grow a Garden?
The highest is Astral at 365x, achieved by combining Cosmic and Galactic mutations. Cosmic itself is a combination of Celestial and Aurora. Admin event mutations like Dawnbound (150x) and Voidtouched (135x) are individually very high but require developer-triggered events. For regular gameplay, Celestial (120x) from a Meteor Shower is the most powerful consistently achievable mutation.
How do I protect my crops from being stolen in Grow a Garden?
The two main protections are a private server and the Favorite Tool. A private server removes the ability for other players to interact with your garden entirely. The Favorite Tool (20,000,000 Sheckles from the Gear Shop) lets you mark specific crops as uncollectable by other players. For Mythical and Divine crops, use both.
What crops give the best Sheckles per minute in Grow a Garden?
At late game, Mint from the Gardener Seed Pack gives roughly 4,400 to 7,700 Sheckles per minute on base value alone. With Mythical and Divine crops plus active mutations during Thunderstorm or Meteor Shower events, the effective Sheckles per minute can jump into the millions. For mid-game players, Dragon Fruit and Bamboo offer the best Sheckles per minute ratio before Mythical seeds become accessible.
What is the fastest way to unlock the Gardener Seed Pack?
Complete Eloise’s daily quests for 7 consecutive days. Each quest is designed to be finishable in a single session. Keeping a small section of Common and Uncommon crops growing alongside your main income plots ensures you can always complete quest objectives without disrupting your farm.
How does mutation stacking work in Grow a Garden?
Mutations stack multiplicatively, not additively. A crop with two mutations applies both multipliers against each other. Bloodlit (4x) and Shocked (100x) on the same crop produces a 400x multiplier on base value, not 104x. The more mutations a crop accumulates, the more explosive the compounding becomes.
Where can I find more information about specific mutations?
For deep dives on individual mutations, this site has dedicated articles on Ceramic, Sundried, and Aurora mutations. For the most complete community-sourced data, the GAG Fandom Wiki is the recognized canonical knowledge base maintained by the player community.
Wrapping Up
Grow a Garden rewards players who understand the system, not just the surface loop. The difference between earning a few thousand Sheckles per session and earning hundreds of millions is almost entirely about mutation timing, crop selection by stage, and compounding your best plots with the right gear and pet combinations.
Start with multi-harvest crops. Protect your farm in a private server once your crops are worth protecting. Stay online during weather events. Complete your daily quests every single day. And before you make any major trade, always check current values first at MyGAGCalculator so you know exactly what your crops and pets are worth before someone else takes advantage of the gap.
The garden never stops growing. Now neither do your Sheckles.