Published by: Saif (May 2026) | Platform: Roblox | Game: Grow a Garden
Weather in Grow a Garden, the farming game on Roblox developed by Splitting Point Studios, is not just something that happens in the background while you tend your crops. Every single weather event has the power to reshape your farming session completely, triggering rare mutations, boosting growth speeds, and multiplying the Sheckles you earn when you sell at the stand.
Whether you are a brand-new farmer trying to figure out why your strawberries suddenly look electrified, or a seasoned grower hunting the 120x Celestial mutation from a Meteor Shower, understanding how the weather system works gives you a real edge over everyone else on your server.
This guide covers all weather events Grow a Garden for 2026, from the everyday Rain and Thunderstorm events right through to the wildest admin-only chaos like Black Hole and Disco. For each event you will find the mutation it triggers, the multiplier value, how often it appears, the best pet to pair with it, and the exact strategy to make the most of it when it hits your garden.
How Weather Events Work in Grow a Garden
The first thing to understand about weather in this game is that every active server experiences the same weather at exactly the same time. When Thunderstorm hits, it hits every garden on your server simultaneously. This means you can plan around it, prepare your plots ahead of time, and know that the window is the same for everyone playing alongside you.
Weather falls into three categories. Standard Weather events occur naturally without anyone triggering them. Event Weather is tied to limited-time seasonal updates and may not return after the event ends. Admin Weather is manually triggered by developers Jandel and BMWLux during special admin abuse sessions.
Most standard weather events last between 3 and 5 minutes. Night-cycle events like Night, Blood Moon, and Meteor Shower run for 10 minutes. Admin events can vary since they are manually controlled.
You cannot force standard weather to happen, but certain tools let you influence where weather strikes and improve your odds of getting specific mutations. The Star Caller, Night Staff, and Lightning Rod are the three most important tools in your weather farming kit, and there is a full breakdown of each later in this guide. Also read Grow a Garden Easter event Guide.
Weather Profit Calculator
Calculator Tool: Weather Profit Estimator
Use the Weather Profit Calculator to find out exactly how many Sheckles your crops will earn during any active weather event. Select your crop type, enter its base value, and choose the weather event currently running on your server. The calculator factors in mutation probability, your variant tier, and crop weight to give you an estimated Sheckle output so you can decide whether to harvest now or wait for a better window.
Complete Weather Events Reference Table

Use this table as your quick reference for every weather event sorted by category. Full strategy breakdowns follow below.
Standard Weather Events
| Weather Event | Mutation | Multiplier | Growth Boost | Duration | Frequency |
| Rain | Wet | 2x | Yes | 3-5 min | Very Common |
| Thunderstorm | Shocked + Wet | 100x + 2x | 50% | 3-5 min | Uncommon |
| Frost | Chilled / Frozen | 2x / 10x | No | 3-5 min | Uncommon |
| Tropical Rain | Drenched | 5x | Yes 50% | 3-5 min | Common |
| Heatwave | Sundried | 85x | No | 3-5 min | Common |
| Windy | Windstruck | 2x | No | 3-5 min | Common |
| Drought | Wilt | Combo use | No | 3-5 min | Occasional |
| Sandstorm | Sandy | Combo use | No | 3-5 min | Occasional |
| Gale / Tornado | Twisted | 30x | No | 3-5 min | Rare |
| Solar Flare | Sundried / Verdant | 85x / 4x | No | ~1 min | Rare |
| Earthquake | Cracked | Unconfirmed | No | 3-5 min | Occasional |
| Aurora | Aurora | Rare tier | Yes 50% | 3-5 min | Rare |
Night-Cycle Weather Events
| Weather Event | Mutation | Multiplier | Growth Boost | Duration | Frequency |
| Night | Moonlit | 2x | No | 10 min | Every 4 hrs |
| Blood Moon | Bloodlit | 4x | No | 10 min | 33% of Nights |
| Meteor Shower | Celestial | 120x | No | 10 min | Rare at Night |
Admin Weather Events
| Weather Event | Mutation | Multiplier | Growth Boost | Duration | Frequency |
| Disco (DJ Sam) | Disco | 125x | No | Varies | Admin Only |
| Black Hole | Voidtouched | 135x | No | Varies | Admin Only |
| Laser Storm | Plasma | 5x | No | Varies | Admin Only |
| Glitch Event | Glitched | 85x | No | Varies | Admin Only |
| Brains | Infected | 75x | No | Varies | Admin Only |
| Cauldron | Brewed | 7x | No | Varies | Admin Only |
| Vampire Bats | Leeched | Unconfirmed | No | Varies | Admin Only |
| Armageddon | Molten + Burnt | Varies | No | Varies | Admin Only |
| Under the Sea | Wet | 2x | Yes | Varies | Admin Only |
| Volcano | Molten / Burnt | Varies | No | Varies | Admin Only |
| Bee Swarm | Pollinated | 3x | No | 10 min | Permanent |
| Data Note: Cracked and Leeched mutation multipliers are not yet confirmed by community testing as of May 2026. Cross-check the official Grow a Garden Fandom wiki or community Discord before using these values in trade decisions. All other values are verified from direct in-game testing and community-verified sources. |
Standard Weather Events: Full Strategy Guide
These are the events you will see most often during regular play. Each one comes with the exact strategy to squeeze the most Sheckles out of the window when it hits.
Rain
Rain is the most common weather event you will encounter and the one that quietly builds enormous value over time if you use it correctly. When dark clouds roll in, your crops have a boosted chance of picking up the Wet mutation at a 2x multiplier. Rain also speeds up plant growth across the board, making it a solid all-around event even before you factor in the mutation chance.
Farming Tip: Before Rain hits, fill every empty plot with a fast-growing crop like Carrots or Tomatoes. Maximise how many Wet mutations land. Rain is also the setup event for the Wet-to-Frozen chain, so do not harvest immediately if Frost is approaching. Equip the Sea Turtle pet during Rain for additional Wet mutation probability on top of the weather effect. See the guide of GAG Farming Tips.
Thunderstorm
Thunderstorm is the single most profitable standard weather event in the game. Lightning bolts strike random crops and apply the Shocked mutation at a 100x multiplier. There is also a 50% chance that struck crops pick up Wet alongside Shocked, and the storm provides a 50% growth speed bonus on top of that.
Shocked is widely considered the most farmable top-tier mutation because it does not require an event pass, a limited pet, or an admin session. Thunderstorm occurs naturally, which means any player at any stage of progression can target it.
Strategy: Place your Lightning Rod in your garden before the storm starts. It directs where lightning strikes, letting you control which crops receive Shocked. Equip the Raiju pet during Thunderstorm for the best combined probability. Fill your highest-value crops into your best plots before the first lightning flash.
Frost
Frost gives crops a chance to gain the Chilled mutation at 2x. On its own that is modest, but Frost becomes genuinely powerful when it follows Rain. Crops already carrying the Wet mutation have a high chance of upgrading straight to the Frozen mutation at 10x. That is the Wet-to-Frozen chain, one of the most reliable mutation outcomes in the game.
Chain Guide: Rain first, then watch for Frost. Do not harvest your Wet crops when Frost starts. Leave them in the ground and let Frozen land before pulling them. Equip the Polar Bear pet during Frost to further improve Chilled and Frozen mutation odds.
Tropical Rain
Tropical Rain applies the Drenched mutation at a 5x multiplier with a 50% growth speed boost. It is strictly better than standard Rain for dedicated mutation farming and is the best non-thunderstorm weather to stack with any existing mutation on your crops.
Heatwave
Heatwave beams of intense heat focus on random crops and apply the Sundried mutation at an 85x multiplier. This is one of the highest-value standard weather events in the game. Have your garden fully planted before it hits because Heatwave gives no advance visual signal.
Windy and Gale / Tornado
Windy applies the Windstruck mutation at 2x. When Windy escalates into Gale and then Tornado, the Twisted mutation applies instead at a much more valuable 30x. If you see Tornado conditions forming, make sure your highest-value crops are planted and stay near your garden.
Drought
Drought applies the Wilt mutation to crops. Wilt does not carry a standalone positive multiplier but plays a role in certain combination mutation chains. Most players use the Drought window to harvest everything ripe and replant before the next valuable weather cycle.
Aurora
Aurora lights up the sky with waves of green, blue, and purple light. It is one of the rarest standard weather events and provides a 50% growth speed boost alongside a chance of applying the Aurora mutation. Aurora is also one half of the Cosmic fusion mutation. If a crop gains both Aurora and Celestial from a Meteor Shower, the two can fuse into the Cosmic mutation at 240x, the highest obtainable mutation in the game alongside Abyssal. This is why farming Aurora events alongside Night cycles is a strategy worth considering for end-game players.
Sandstorm
Sandstorm applies the Sandy mutation which is a combo-source mutation that pairs with Flooded to unlock Muddy. It is useful in specific advanced mutation builds and is a collector favorite.
Solar Flare
Solar Flare applies either Sundried at 85x or Verdant at 4x. It is extremely short, sometimes lasting only seconds. Have your garden fully planted beforehand because there is no time to react once it starts.
Earthquake
Earthquake debuted during an admin session ahead of the Fairy Part 2 update and has since become a standard weather event. Crops receive the Cracked mutation. The exact Sheckle multiplier for Cracked is not yet community-verified as of May 2026, so treat it as a bonus event rather than a primary target until confirmed data is available.
Night-Cycle Weather Events: The High-Value Window
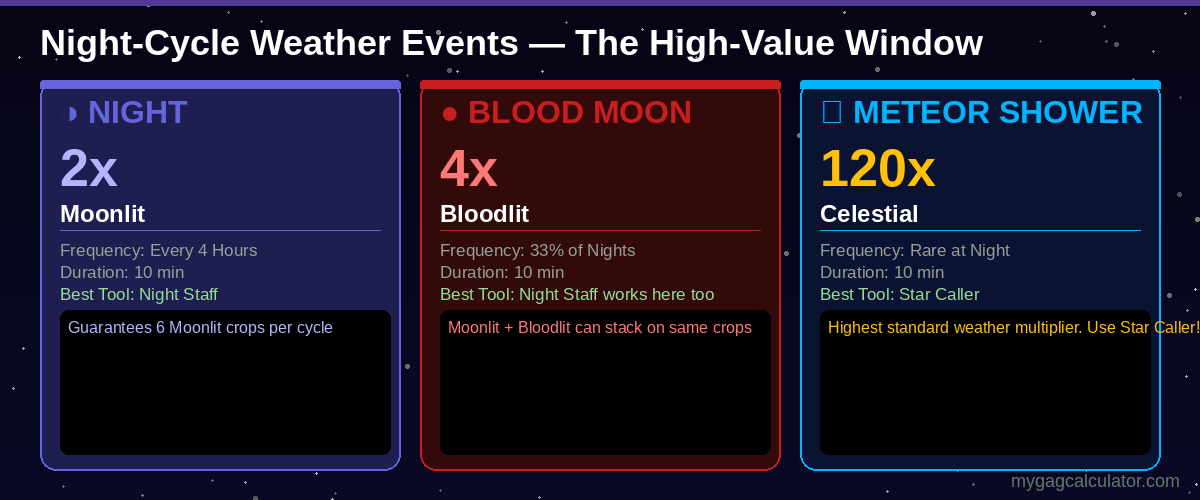
Night-cycle events run on a fixed schedule every four hours and last approximately ten minutes. Build your play session around these windows because this is where the highest natural multipliers live.
Night
Night gives every crop in your garden a chance to gain the Moonlit mutation at 2x. Night occurs every four hours on a reliable schedule, making it the most predictable event to plan around.
Tool Pairing: The Night Staff, earned through the Lunar Quest, guarantees that six specific crops in your garden receive Moonlit every Night cycle. Place it before Night begins for consistent results. The Lunar Quest itself takes several play sessions to complete but the Night Staff payoff is permanent.
Blood Moon
Blood Moon replaces roughly one in three Night events and gives crops a high chance of gaining the Bloodlit mutation at 4x. Because Blood Moon replaces Night rather than adding to it, the Night Staff still functions and gives you Moonlit on top of Bloodlit chances on the same crops. This makes Blood Moon one of the best natural events for stacking two mutations simultaneously.
Meteor Shower
Meteor Shower is the rarest and most valuable natural weather event in the game. Fiery meteors strike crops and apply the Celestial mutation at an extraordinary 120x multiplier. This is the primary end-game farming target for players using standard weather alone.
Critical Tip: Place the Star Caller tool in your garden BEFORE Meteor Shower begins, not during. The Star Caller directs meteors toward your garden dramatically improving Celestial odds on your most valuable crops. Placing it mid-event wastes the early minutes of the window.
Meteor Shower can co-occur with Blood Moon on the same Night cycle. Stacking Celestial at 120x and Bloodlit at 4x produces a 480x combined multiplier on a single crop. This is one of the highest-value farming outcomes in the game using only standard weather. Long-term, farming Celestial is also the first step toward the Cosmic fusion mutation at 240x when Aurora is also present on the same crop.
Admin Weather Events: What They Are and How to Prepare

Admin weather events are manually triggered by Jandel and BMWLux during sessions known as admin abuses. The developers typically give a short advance notice through in-game announcements. When you see one, treat it as your signal to clear your harvest queue, fill every plot with your highest-value crops, and activate your best pets immediately.
Disco (DJ Sam)
The Disco event transforms the map into a neon-lit dance floor and applies the Disco mutation at 125x. DJ Sam kicks it off and the background music shifts noticeably, usually to It Is Raining Tacos or the spinning cat remix. Disco is one of the most valuable admin events in the game and also the mutation the Disco Bee pet can apply passively outside of admin sessions.
Black Hole
The Black Hole event alters gravity and allows players to float and jump abnormally high. Crops can receive the Voidtouched mutation at 135x, the highest multiplier available from any admin event. Voidtouched is also the primary ingredient in the Abyssal fusion mutation at 240x, which requires Voidtouched plus Eclipsed on the same crop. Any crop that picks up Voidtouched during Black Hole is worth protecting and maximising because it is already halfway to the highest obtainable mutation in the game.
Laser Storm
Laser Storm strikes crops with beams and applies the Plasma mutation at 5x. Crops hit by plasma emit a sparkly purple glow. Shorter than Disco or Black Hole but still worth preparing for.
Brains (Zombie Invasion)
Jandel transforms into a zombie lord and triggers a horde invasion. Random crops receive the Infected mutation at 75x. This is one of the more dramatically staged admin events and produces excellent Sheckle value when your garden is fully planted at the start.
Armageddon
A meteor crashes into the map and lava erupts. Crops receive Molten and Burnt mutations during the chaos. Position yourself carefully during lava phases while keeping your eye on which crops are getting hit.
Glitch Event
The screen shows “The world is losing connection” and the event reads “Roblox is breaking.” Crops gain the Glitched mutation at 85x. Visually disorienting but highly profitable if your garden is ready.
Cauldron Event
A giant cauldron spawns and players fill it with harvested fruits. Once at capacity it releases a burst applying the Brewed mutation at 7x across the garden. This is a community participation event, so a full server fills the cauldron much faster than a half-empty one.
Vampire Bats Attack
Players transform into bats and complete a mini-game while random fruits receive the Leeched mutation across the garden. The exact multiplier for Leeched is not yet community-verified as of May 2026. Glass Animals performs their song Vampire Bat live during this event.
Bee Swarm and Working Bee Swarm
A large bee visits your garden and applies the Pollinated mutation at 3x over 10 minutes. The Working Bee Swarm variant also provides a 10x crafting speed boost. Bee Swarm is now a permanent event following the Bizzy Bees update. The Bizzy Bees update also introduced the HoneyGlazed mutation at 5x, which can stack with Pollinated for a combined 15x multiplier on the same crop. The Disco Bee pet can apply the Disco mutation (125x) independently of admin sessions, making it one of the most valuable non-event pets in the game.
Find the Pet
A number of pets spawn across the map and players hunt for the specific one shown on the message board. Reward is a random egg from Rare to Legendary rarity. Not a mutation event but the egg reward can unlock pets that dramatically improve your long-term mutation probability.
Other Admin Events
- Obby: Obstacle course challenge. Cosmetic Jump Pad reward. No mutation.
- Restock Fever: Higher-tier seeds restocked across the map. No direct mutation but creates a strong farming prep window.
- Under the Sea: Floods the entire map and applies Wet mutations. Swimming mechanic enabled.
- Carrot Rocket: Jandel arrives in a giant carrot rocket. Players submit large fruits to fuel the launch.
Weather Mutation Stacking: How the Math Works
This is the part that separates casual farmers from players earning billions of Sheckles per session. Understanding stacking correctly is the single biggest upgrade most players can make to their strategy.
Step 1: Variant Mutations
Variant mutations are the first multiplier layer applied to any crop and the only appearance-based category in the game. You can only have one variant per crop. Gold applies a 20x multiplier, Silver applies 5x, and Rainbow applies 50x. Variants are mutually exclusive with each other but stack with every weather mutation below. A Rainbow crop going into a Meteor Shower already starts at 50x before Celestial even lands.
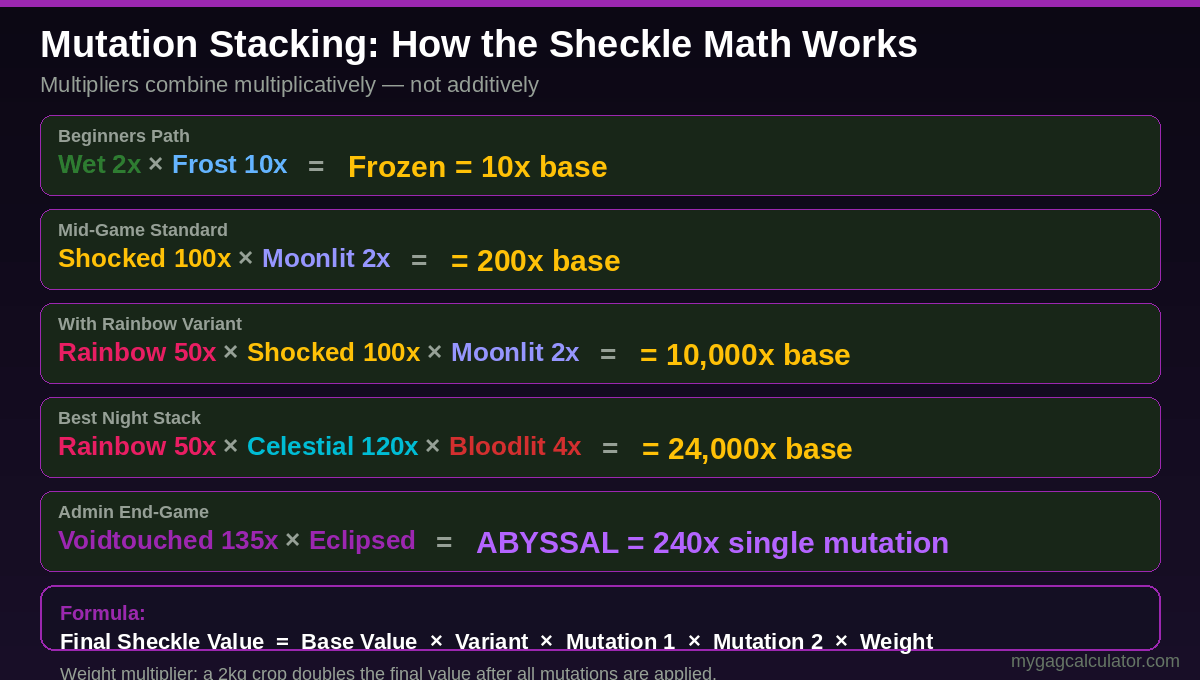
Step 2: Weather and Environmental Mutations
Weather mutations stack multiplicatively on top of your variant. The formula is: Base Value x Variant x Mutation 1 x Mutation 2 x Mutation 3 and so on. The weight of your crop at harvest applies a further multiplier at the end. A 2kg crop doubles the final Sheckle value calculated from all the mutation layers. Use the Weather Profit Calculator above to compute exact outputs with weight factored in.
Concrete example: A Strawberry at 50 Sheckles base value with a Rainbow variant (50x), Shocked from Thunderstorm (100x), and Moonlit from Night (2x) stacks to: 50 x 50 x 100 x 2 equals 500,000 Sheckles. Add a crop weight of 2kg and the final value doubles to 1,000,000 Sheckles. This is entirely achievable in a single session with no admin events required.
Step 3: Fusion Mutations and When to Avoid Them
Fusion mutations replace both source mutations with a single higher-value mutation. This is not always a gain. Frozen at 10x from Wet (2x) plus Chilled (2x) replaces a combined 4x with 10x which is a clear upgrade worth taking. Cosmic at 240x from Celestial (120x) plus Aurora replaces those two sources, which stacked independently would produce 120x times the Aurora multiplier. Whether Cosmic is worth triggering depends on the Aurora multiplier value at the time of fusion. In most cases, keeping Celestial and Aurora as independent stacks is more valuable than the Cosmic fusion.
The Highest Stacking Targets
The current end-game stacking goals based on weather events are:
- Meteor Shower + Blood Moon co-occurrence: Celestial (120x) x Bloodlit (4x) x Rainbow (50x) = 24,000x base. Achievable through standard play with the right night cycle conditions.
- Thunderstorm + Night: Shocked (100x) x Moonlit (2x) x Rainbow (50x) = 10,000x base. The most consistently farmable triple-stack.
- Black Hole (Voidtouched 135x) + Eclipsed = Abyssal fusion at 240x. Requires an admin event for Voidtouched, making this the highest achievable single-mutation outcome.
- Tropical Rain (Drenched 5x) + Thunderstorm (Shocked 100x) in sequence: Combined 500x before any variant multiplier.
| Fusion Warning: Cosmic (Celestial + Aurora) and Abyssal (Voidtouched + Eclipsed) are fusion mutations that replace both source mutations. Make sure you understand what you are giving up before allowing a fusion to trigger. The Frozen fusion from Wet plus Chilled is almost always worth it. Cosmic requires case-by-case calculation. |
Best Pets to Pair With Each Weather Event
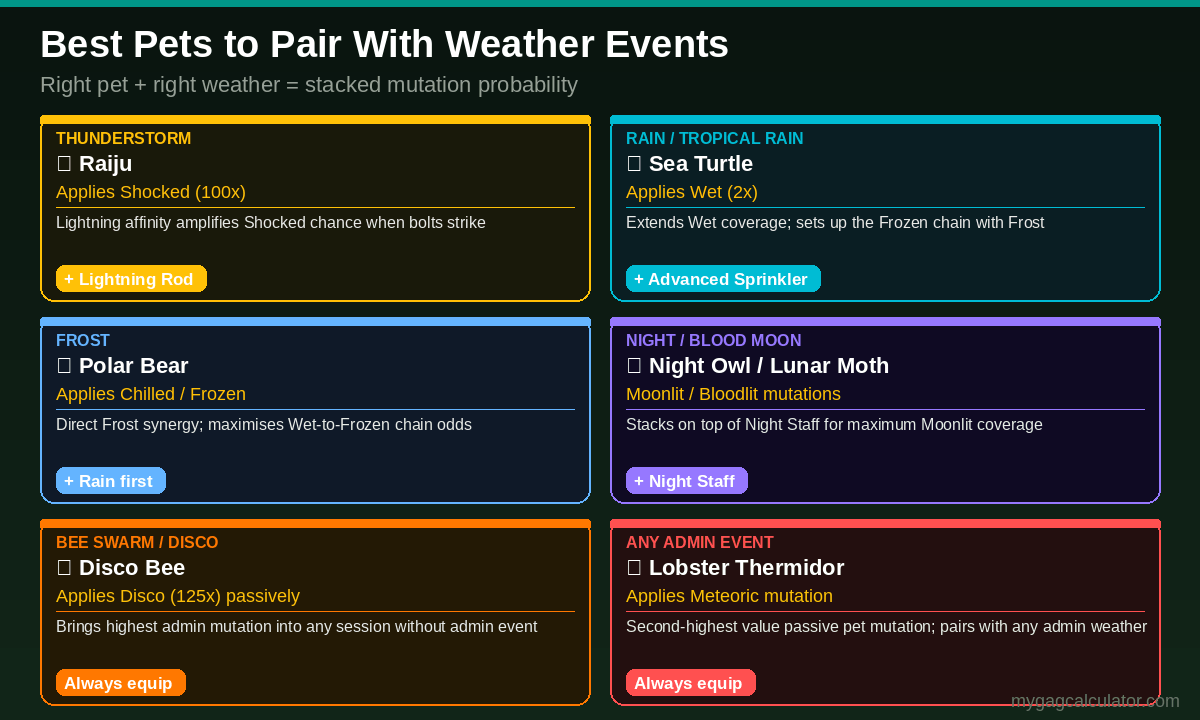
Pets are the farming companion to weather events. The right pet paired with the right weather event compounds mutation probability well beyond what tools alone can achieve. Here are the top pet pairings across every major weather category. Use our Pet Calculator.
| Weather Event | Best Pet | Pet Ability | Why It Works |
| Thunderstorm | Raiju | Applies Shocked mutation directly to crops | Natural affinity with lightning; stacks Shocked probability with the storm itself |
| Rain / Tropical Rain | Sea Turtle | Applies Wet mutation to nearby crops | Extends Wet mutation coverage beyond what Rain alone applies; sets up Frozen chains |
| Night / Blood Moon | Night Owl or Lunar Moth | Moonlit or Bloodlit mutation application | Pairs with Night Staff for the highest possible Moonlit coverage per cycle |
| Frost | Polar Bear | Applies Chilled mutation; can trigger Frozen with Wet | Direct synergy with Frost weather; maximises Frozen fusion chain probability |
| Bee Swarm / Disco | Disco Bee | Applies Disco mutation (125x) passively | Brings the highest admin event mutation into any session without needing an admin event |
| Meteor Shower | Any high-value crop pet | Bonus mutation probability on rare crops | Use your highest-rarity pet to stack additional mutations on crops targeted by Star Caller |
| Any admin event | Lobster Thermidor | Applies Meteoric mutation passively | Second-highest value passive pet mutation; pairs with any high-multiplier admin event |
For a complete pet ranking with multiplier values, rarity tiers, and acquisition methods, see the full pet tier list guide.
Tools That Influence Weather Outcomes
You cannot control when standard weather events happen, but these tools let you influence where weather lands and improve mutation odds on your most valuable crops.
| Tool | Best Weather | Effect | How to Get |
| Star Caller | Meteor Shower | Directs meteors to your garden; boosts Celestial odds | Purchased from the in-game shop |
| Night Staff | Night / Blood Moon | Guarantees Moonlit on 6 crops every Night cycle | Earned through the Lunar Quest |
| Lightning Rod | Thunderstorm | Directs lightning for targeted Shocked mutations | Purchased from the in-game shop |
| Basic Sprinkler | Any weather | Applies Wet independently of Rain; entry-level prep tool | Purchased from the in-game shop |
| Advanced Sprinkler | Any weather | Stronger Wet and Gold mutation probability | Purchased from the in-game shop |
| Godly Sprinkler | Any weather | Best Wet and Gold probability; strongest pre-weather prep | Purchased from the in-game shop |
General Rule: Place every tool before the event starts, not during. By the time you see weather hit you have already lost 30 to 60 seconds of the window. Keep tools in place as part of your standard routine.
Seed and Pet Drops From Weather Events
Weather events are not only about mutations. Certain events carry a chance of dropping exclusive seeds and pets not available through the standard shop.
- Frostspike Seed: Has a chance to drop during Frost events. Not available through the standard shop.
- Snaparino Beanarini Seed: Drops during specific event weather sessions. Check the event feed carefully when unusual weather rolls in.
- Woody: A pet obtainable through select weather event drops.
- Chicken Zombie: Tied to specific weather event sessions. Once obtained, the Chicken Zombie pet applies the Zombified mutation to nearby crops every 30 minutes, making it useful beyond just being a collectible.
Always read event announcements carefully. Seed and pet drop opportunities are not flagged as prominently as mutation effects. Miss the notification, miss the window.
Server Behaviour and When to Server Hop
Since every player on a server experiences the same weather simultaneously, your farming results are tied to whatever cycle your current server happens to be running. Hopping to a new server resets your position in the local weather cycle, which is useful when waiting for Thunderstorm or Meteor Shower and nothing valuable has appeared in a long time.
Full servers are worth prioritising for community participation events like Cauldron because more players means faster fills. For solo mutation farming of standard events the server population matters less. For admin abuse events specifically, only servers that Jandel or BMWLux are actively playing on experience admin weather. Staying active in the community Discord where players post when admin abuse is live is the fastest way to get onto the right server.
Frequently Asked Questions
What is the rarest weather event in Grow a Garden?
| Meteor Shower is the rarest naturally occurring weather event in Grow a Garden. It only appears during Night cycles and is uncommon even then, giving crops a chance at the Celestial mutation at a 120x multiplier. |
Among admin-only events, Black Hole and Brains are the rarest since they depend entirely on developer availability during admin abuse sessions and follow no fixed schedule. If you are chasing Meteor Shower specifically, the Star Caller tool is your best tool for improving the hit rate on your crops when one does appear.
Which weather event gives the highest mutation multiplier in Grow a Garden?
| Among standard and night-cycle events, Meteor Shower gives the highest single mutation multiplier at 120x via the Celestial mutation. Among admin events, Black Hole gives the highest at 135x via Voidtouched. Stacking Voidtouched with Eclipsed creates the Abyssal fusion at 240x, the highest obtainable mutation in the game. |
Disco at 125x is the second-highest admin event multiplier. The Disco Bee pet can apply the Disco mutation passively outside of admin sessions, which is part of why it is considered one of the most valuable pets in the game for regular farming.
Can weather mutations stack in Grow a Garden?
| Yes. Mutations in Grow a Garden stack multiplicatively. A crop with Shocked (100x) and Moonlit (2x) is worth 200x its base value, not 102x. Adding a Rainbow variant (50x) produces 10,000x the base. Stacking compatible mutations during overlapping weather windows is the foundation of end-game Sheckle farming. |
The most effective stacking window is Thunderstorm occurring during Night. Shocked at 100x stacked with Moonlit at 2x gives a 200x combined multiplier before any variant is applied. If Blood Moon coincides with a Meteor Shower on the same night cycle, Celestial (120x) plus Bloodlit (4x) produces a 480x combined multiplier, one of the highest achievable through standard weather alone.
How do I get the Celestial mutation in Grow a Garden?
| The Celestial mutation (120x) is obtained during Meteor Shower weather events. Place the Star Caller tool in your garden before the event begins. Meteor Shower only occurs during Night cycles and is rare. Use your highest-value crops and best available pets when one appears. |
Celestial is also the first step toward the Cosmic fusion mutation at 240x. If a crop gains both Celestial and the Aurora mutation on the same harvest, the two fuse into Cosmic. However, in most cases keeping Celestial as a standalone 120x is more valuable than allowing the fusion, unless your Aurora value at that moment is high enough to make the combined Cosmic worth triggering. Use the Weather Profit Calculator above to work this out for your specific crop values.
What is the best pet to use during Thunderstorm in Grow a Garden?
| The Raiju is the best pet to pair with Thunderstorm events. It is a lightning-type pet with a natural affinity for the Shocked mutation (100x), improving the probability that crops receive Shocked when lightning strikes. Pair Raiju with a Lightning Rod tool for the best combined outcome. |
If you do not yet have the Raiju, any pet that increases general mutation probability will improve your Thunderstorm results. Focus on getting the Lightning Rod first as it is purchased from the in-game shop and has the most direct impact on which specific crops get struck during the storm.
How often does Thunderstorm happen in Grow a Garden?
| Thunderstorm is an uncommon weather event with no fixed schedule. It can appear multiple times in a session or go a long time without triggering. Server hopping is a valid strategy when specifically farming Thunderstorm for the Shocked mutation. |
Unlike Night which appears every four hours, Thunderstorm is part of the random standard weather rotation. There is no reliable countdown for it outside of tracking patterns across multiple servers over time.
What is the Wet to Frozen chain in Grow a Garden?
| The Wet-to-Frozen chain is triggered when Rain applies the Wet mutation (2x) to your crops and Frost weather follows before you harvest them. The Wet mutation upgrades to the Frozen mutation (10x) on crops that are still in the ground when Frost hits. Do not harvest Wet crops early. |
Frozen is a fusion mutation, which means it replaces both the Wet and Chilled source mutations with a single 10x result. This is a genuine upgrade from the 4x combined value of having both Wet and Chilled separately. The Polar Bear pet applied during Frost improves the odds of Chilled landing on the same crops that are already Wet, making it the ideal companion for this chain.
What happens during Admin Abuse in Grow a Garden?
| Admin Abuse sessions are unscheduled events run by the Splitting Point Studios development team, specifically Jandel and BMWLux, during which developers manually trigger exclusive weather events and interact with the community. When a session begins, an in-game announcement appears. Fill your garden immediately with high-value crops and activate your best pets. |
Admin abuse events are per-server, meaning only the servers that Jandel or BMWLux are actively playing on experience admin weather. The community Discord is the fastest way to find out when a session is live. The development team typically gives a short advance notice for major updates but admin abuse itself can begin without much warning.
What is the Abyssal mutation and how do you get it?
| Abyssal is the highest obtainable mutation in Grow a Garden at 240x. It is a fusion mutation created when both Voidtouched (135x, from the Black Hole admin event) and Eclipsed are present on the same crop simultaneously. Voidtouched requires a Black Hole admin event, making Abyssal one of the rarest outcomes in the game. |
If you are farming toward Abyssal, the priority is getting Voidtouched during a Black Hole session and then separately sourcing Eclipsed through the appropriate pet or event. Do not allow the Abyssal fusion to trigger on a low-value crop. Save it for your highest base-value planted fruit to maximise the 240x return.
Do weather events affect all players on the server the same way?
| Yes. Weather in Grow a Garden is server-wide and synchronised. Every player on your server experiences the same weather at the same time. The only exception is during Admin Abuse sessions where developers can occasionally create different conditions on specific servers. |
This server synchronisation is both a constraint and an advantage. You cannot get Meteor Shower while your neighbour has Thunderstorm, but you can plan farming sessions around the same weather cycle, share farming windows with friends on the same server, and use server hopping deliberately to find a server currently running valuable weather.
What is the best weather event for beginners in Grow a Garden?
| Rain is the best starting point because it is the most common event and the Wet mutation (2x) is the easiest to collect reliably. Once you have a Lightning Rod, Thunderstorm becomes the top beginner target because the Shocked mutation (100x) is achievable through entirely standard gameplay with no special event access, limited pets, or paid items required. |
From there, Night is the next step. It occurs every four hours and the Moonlit mutation at 2x is consistent. Once you have the Night Staff from the Lunar Quest, Night farming becomes a reliable passive income source you can build a full farming routine around.
Final Thoughts: Master the Sky, Master the Farm
Weather is the engine that drives everything valuable in Grow a Garden. Every mutation guide, every crop tier list, and every profit strategy on this site traces back to the weather system at some point. The players earning the most Sheckles are not the ones who got lucky. They are the ones who filled their plots before the event hit, placed their tools in advance, understood which mutations chain together, and paired the right pet with the right weather.
If you are just starting out, focus on Rain, Thunderstorm, and Night. Master the Wet-to-Frozen chain, get your first Lightning Rod, equip the Raiju during storms, and learn to position your Star Caller before Meteor Shower hits. From there, everything else in this guide becomes the natural next step.
This guide is updated whenever Sgame add new weather events or adjust existing multipliers. Bookmark it and check back after each major update to make sure your farming strategy is always using the latest verified data.