Published by: Saif (Aug 2026) | Platform: Roblox | Game: Grow a Garden
Grow a Garden is one of the most deceptively deep farming games on Roblox. The surface loop looks simple: plant seeds, wait, harvest, sell. But the players stacking billions of Sheckles while casual gardeners grind for loose change are not just luckier. They have learned something the beginner tutorial never explains: this game runs like an economy, not a clicker.
The Grow a Garden beginner mistakes below are not minor inefficiencies. Several of them carry the potential to set back progress by days or weeks. They are organized by category, from economy and crop decisions through to pets, events, and trading, because the order in which players typically make these mistakes follows a pattern. Most new players hit the currency and crop errors first, then the mutation and gear mistakes as they scale, then the pet and event mistakes as they push into mid-game.
Every mistake in this guide has an exact fix attached. Nothing here is vague encouragement to “play smarter.” The goal is to walk away knowing precisely what to stop doing and what to do instead.
Quick Reference: The Most Common Grow a Garden Mistakes at a Glance
For anyone who wants the fast version before diving into the full explanations, this table covers the highest-impact errors and their one-line fixes.
| Staying on carrot seeds too long | Use carrots only to reach 50 Sheckles, then switch immediately to multi-harvest crops like Strawberry or Bamboo. |
| Harvesting during weather events | A crop must be in the ground when a mutation lands. Never harvest mid-Thunderstorm or mid-Blood Moon. |
| Planting crops before placing sprinklers | Sprinklers only affect crops placed after they are set down. Place every sprinkler first, then plant. |
| Stacking two sprinklers of the same tier | Same-tier sprinklers do not stack. One of each tier is the correct method. |
| Spending Robux on the seed shop refresh | The seed shop restocks every 5 minutes for free. Robux refreshes almost never produce high-value seeds. |
| Letting pet hunger reach zero | A pet at zero hunger has its ability paused. Feed pets before every AFK session. |
| Running Monkey with mutation pets | Monkey auto-collects before mutation pets cycle. These two should never be in the same slot rotation. |
| Missing Admin Abuse entirely | Enable Discord notifications. Have empty plots and full Sheckles ready before the session starts. |
| Trading without checking values | Use the Trade Calculator before every single trade. The first offer is almost always a lowball. |
| Bulk selling mutated crops by accident | Favorite every high-value crop immediately after harvest. Favorited crops cannot be bulk sold. |
Economy and Currency Mistakes
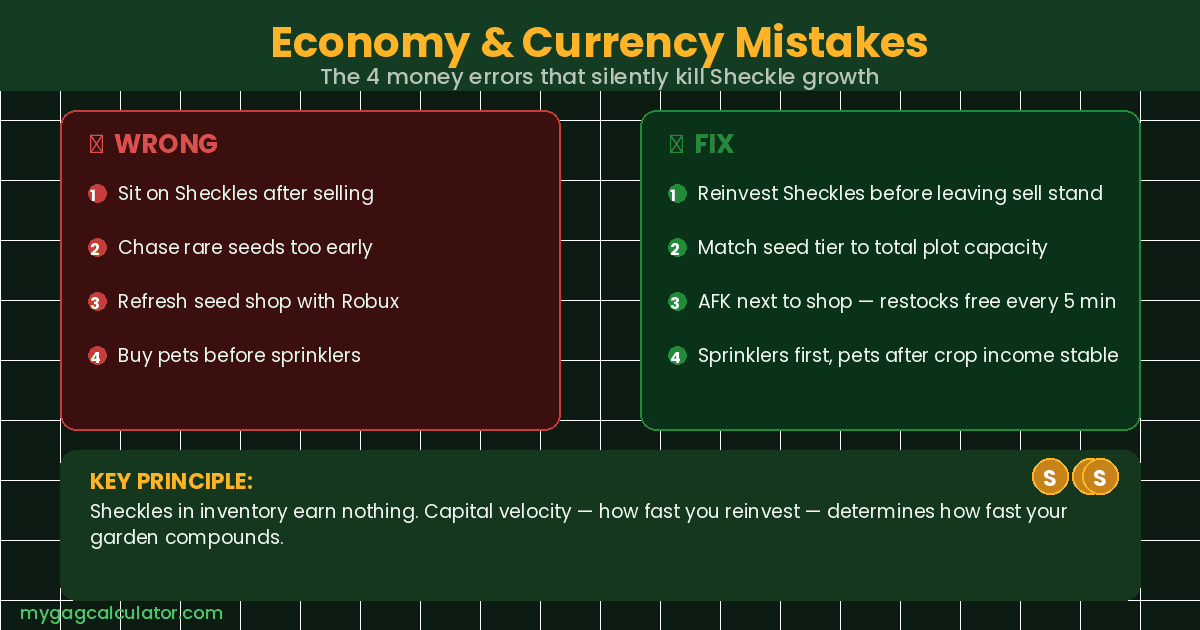
Mistake 1: Sitting on Sheckles Instead of Reinvesting Immediately
Sheckles sitting in inventory earn nothing. Grow a Garden rewards capital velocity, the speed at which players convert earned currency back into active farming capacity. Every minute of idle Sheckles is a minute of compounding income lost. See our guide on how to make sheckles fast?
The rule experienced players follow is simple: buy the next best seed the moment a harvest is sold. This is not impulsive spending. It is recognising that idle Sheckles represent dead capital. A garden that reinvests immediately compounds income across every cycle, while a garden that holds currency is essentially running at partial capacity.
The fix is mechanical: set a rule to spend Sheckles before leaving the sell stand. If there is nothing immediately worth buying, the seed shop restocks every five minutes. Wait there rather than walking away with unspent currency.
Mistake 2: Chasing Expensive Seeds Before the Budget Supports Them
A 10,000-Sheckle seed planted on two plots earns less than 200-Sheckle seeds spread across every available plot. This surprises most new players, but the math is consistent: more cheap seeds with multi-harvest potential outperforms fewer expensive seeds at the wrong budget tier.
The trap is the perceived prestige of rare seeds. Seeing a Legendary or Mythical seed in the shop feels like an opportunity. For a player who cannot fill every plot around it and cannot afford the sprinkler infrastructure to support it, that seed is an over-investment that leaves most of the garden empty and underperforming.
The fix is to match seed tier to total garden capacity. The Profit Calculator shows exact Sheckles-per-hour output for any crop across any number of plots. Running two or three crop scenarios before spending shows immediately which option earns more at the current garden size.
Mistake 3: Spending Robux on the Wrong Things
Three Robux purchases are reliably bad value in Grow a Garden: buying Sheckles directly from the shop, buying Night Seeds egg packs, and pressing the seed shop refresh button. All three share the same flaw. There is no pity system on egg packs, meaning a player can spend hundreds of Robux and receive nothing above Common rarity. The seed shop refresh almost never produces Mythical or Legendary seeds, and buying Sheckels directly trades real money for in-game currency at rates that do not reflect the actual earning potential of a well-run garden.
The Grandmaster Sprinkler is the single best Robux purchase in the game. It provides permanent, compounding value on every session. Premium eggs, specifically those purchased once per rotation rather than repeatedly, are also far stronger value than seed packs. If Robux is available, it should go on infrastructure that persists, not consumable packs with no pity floor.
Mistake 4: Over-Investing in One Area Before the Others Are Stable
Pets before sprinklers. Expanded plots before the existing plots are full. Rare seeds before the garden has the infrastructure to support them. Any of these sequences produces the same result: uneven progress that costs more to correct than it would have to build in order.
The correct investment order for new players is: multi-harvest crop coverage across all plots first, then a Basic Sprinkler, then the next tier sprinkler, then plot expansion if all existing plots are full and profitable, then pets once crop income is stable. Skipping steps in this sequence does not accelerate progress. It creates gaps that actively limit the steps that come after.
Crop and Plot Mistakes
Mistake 5: Staying on Single-Harvest Crops Past the Early Game
Carrot seeds are the right starting crop. They grow quickly enough to generate the first 50 Sheckles for a Strawberry seed. That is where their value ends.
Single-harvest crops like carrots disappear after one yield and return no further income. Multi-harvest crops like Strawberry, Tomato, Blueberry, Corn, and Bamboo continue producing across every cycle without requiring a new seed purchase. Over ten harvests, a multi-harvest crop earns ten times the income of the same plot running single-harvest crops, and does so without re-spending on seeds.
The switch should happen as early as the budget allows. The full crop reference shows every plant in the game alongside its harvest type and base value. Once a player can afford a multi-harvest option, single-harvest crops should only ever appear as plot fillers when nothing better is available in the shop.
Mistake 6: Planting Trap Crops — Corn, Blueberry, and Dragon Fruit
Three crops consistently underperform relative to their cost and the plot space they occupy:
- Corn has low community demand in trading and does not justify the plot space relative to alternatives at a similar price.
- Blueberry has a disproportionately long growth time relative to its sell value. The time cost per Sheckle earned is poor compared to similarly priced alternatives.
- Dragon Fruit was once strong but has been power-crept by event seeds. It now occupies valuable plot space without providing competitive returns.
The fix is to check a current farming guide before committing Sheckles to any crop that looks appealing in the shop. Rarity does not determine profitability. Plot-time-per-Sheckle does.
Mistake 7: Leaving Garden Plots Empty
Every empty plot is income that does not exist. Even a carrot seed generating minimal return per cycle is producing more than an empty plot that generates zero. If the seed shop has nothing worth buying and no better crops are available, filling plots with the cheapest available multi-harvest crop keeps capital velocity running.
The stronger version of this error is leaving plots empty while holding Sheckles. Idle Sheckles plus empty plots is a compounded mistake. Both problems have the same fix: spend the Sheckles, fill the plots, then upgrade as better options become available.
Mistake 8: Poor Garden Layout and Crop Placement
Sprinklers have a radius. Crops planted outside that radius receive none of the sprinkler’s benefits. Players who scatter crops randomly across the garden end up with a mix of boosted and unboosted plants, losing a significant portion of the sprinkler’s value without realising it.
Beyond sprinkler coverage, certain crops create movement problems. Bamboo and large trees can block pathing in ways that slow harvesting. Placing a high-value crop in a difficult-to-reach position adds unnecessary friction during time-sensitive weather events.
The fix is deliberate zone design. Group crops by value tier and centre each group within sprinkler coverage. Keep high-value crops accessible. The Crop Planner tool helps model layout decisions before committing to them in-game.
Mutation Mistakes
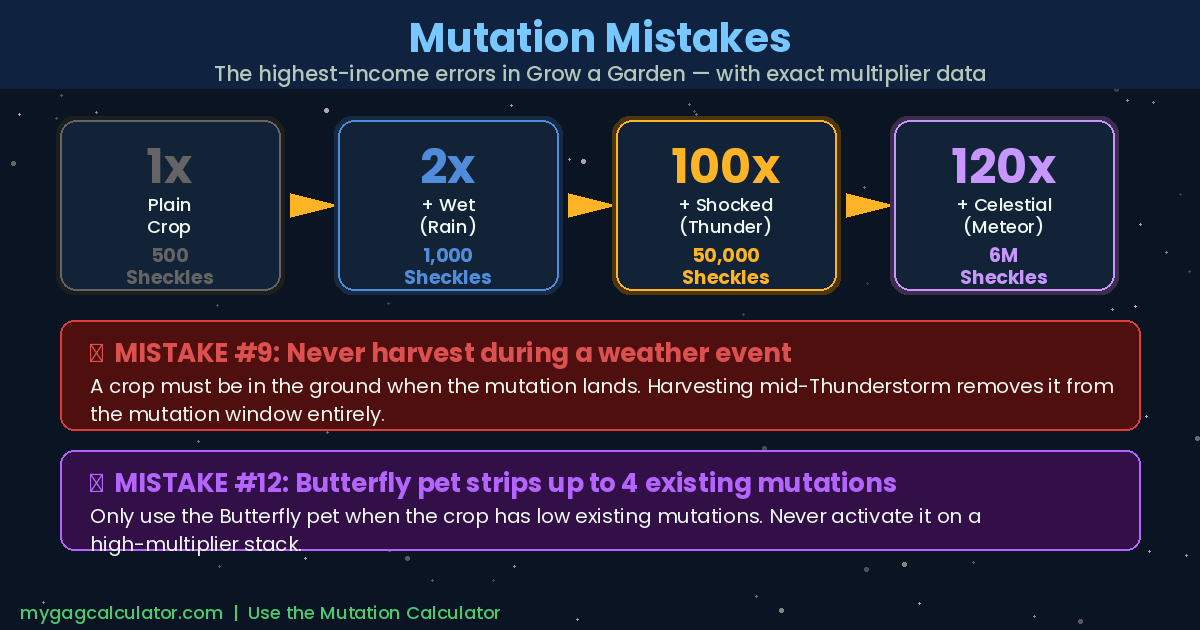
Mutations are the single highest-income category in the game. A plain crop and a mutated crop are not different in degree. They are different in kind. A Shocked mutation carries a 100x multiplier. A Rainbow mutation carries a 50x multiplier. Getting mutations right, and avoiding the errors that destroy mutation value, matters more than almost any other system in Grow a Garden. The complete mutation guide covers every multiplier in detail.
Mistake 9: Harvesting Crops Before Weather Events Land
This is the highest-income mistake in the game. A crop that has already been harvested when a Thunderstorm, Blood Moon, or Meteor Shower begins cannot receive the mutation from that event. The mutation applies to crops that are in the ground when the event triggers, not crops that were recently growing.
Experienced players do the opposite of new players during weather events. They hold harvests, not execute them. A crop sitting in the ground during a Thunderstorm has a chance to receive the Shocked mutation, which multiplies its base value by 100x. That same crop harvested five minutes before the storm starts is worth its base value and nothing more.
The fix is to treat approaching weather events as a hold signal, not a harvest signal. The weather events guide covers every event type, what mutations they produce, and how to read the signs that an event is coming. The Weather Tracker helps players monitor live event timing so nothing is missed.
Mistake 10: Selling Mutated Crops by Accident
Bulk selling is fast and convenient until a player accidentally sells a crop carrying a Gold (20x), Rainbow (50x), Shocked (100x), or Celestial (120x) mutation. A single misclick in bulk sell can erase what would have been a defining harvest.
Grow a Garden has a protection system for this: the Favorite function. Any crop with a star icon showing in inventory is locked and cannot be bulk sold. The fix is to make favoriting a reflex. After every harvest that produces a visibly valuable crop, favorite it before doing anything else. This is especially important during Candy Blossom and event periods when the inventory fills quickly and bulk actions are tempting.
Players who want to know the exact Sheckle value of a mutated crop before deciding whether to sell or hold can run it through the Mutation Calculator, which uses the game’s official stacking formula to return an exact output for any crop-weight-mutation combination.
Mistake 11: Not Stacking Mutations
Mutations in Grow a Garden stack multiplicatively. A crop with Wet (2x) and Shocked (100x) does not earn 102x its base value. It earns 200x. A crop with Shocked (100x), Celestial (120x), and Rainbow (50x) is not 270x. It is 600,000x the base crop value.
New players almost always harvest too early, taking the first mutation as the final payout. Experienced players hold. They check the weather event schedule for upcoming events that could add a second or third mutation layer. A Wet crop sitting through the next Thunderstorm becomes Wet-Shocked. That is a 200x multiplier on what started as a 2x crop, from holding for one additional event.
The Wet to Frozen chain is one of the most reliable stacking paths for mid-game players. Wet arrives during Rain (2x). If the crop sits through a subsequent frost event, the Wet upgrades to Frozen (10x). Two events, one crop, 10x multiplier. The Wet mutation guide breaks this chain down step by step.
Mistake 12: The Butterfly Pet Danger
The Butterfly pet applies a Rainbow mutation to crops, which sounds straightforwardly positive. The danger is that it also strips up to four existing mutations in the process. A crop that has been carefully stacked with Shocked, Celestial, and Moonlit mutations is worth far more with that stack intact than it is with a Rainbow mutation replacing them.
Players who run the Butterfly pet without understanding this mechanic regularly destroy their highest-value crops. The fix is to use the Butterfly only when the crop has low existing mutations and a Rainbow outcome would represent a net improvement. Never activate it on a crop with a high-multiplier stack already in place.
Mistake 13: Not Using the Favorite Tool to Protect Crops
The Favorite tool does more than prevent accidental bulk sales. It also protects crops from being consumed by pet feeding if inventory management gets complicated during a busy weather event session. A crop marked as favorited is locked across every accidental action type that affects inventory.
The habit to build: every high-value crop gets favorited before anything else happens to it. Not after selling some of the batch. Before.
Sprinkler and Gear Mistakes
Mistake 14: Planting Crops Before Placing Sprinklers
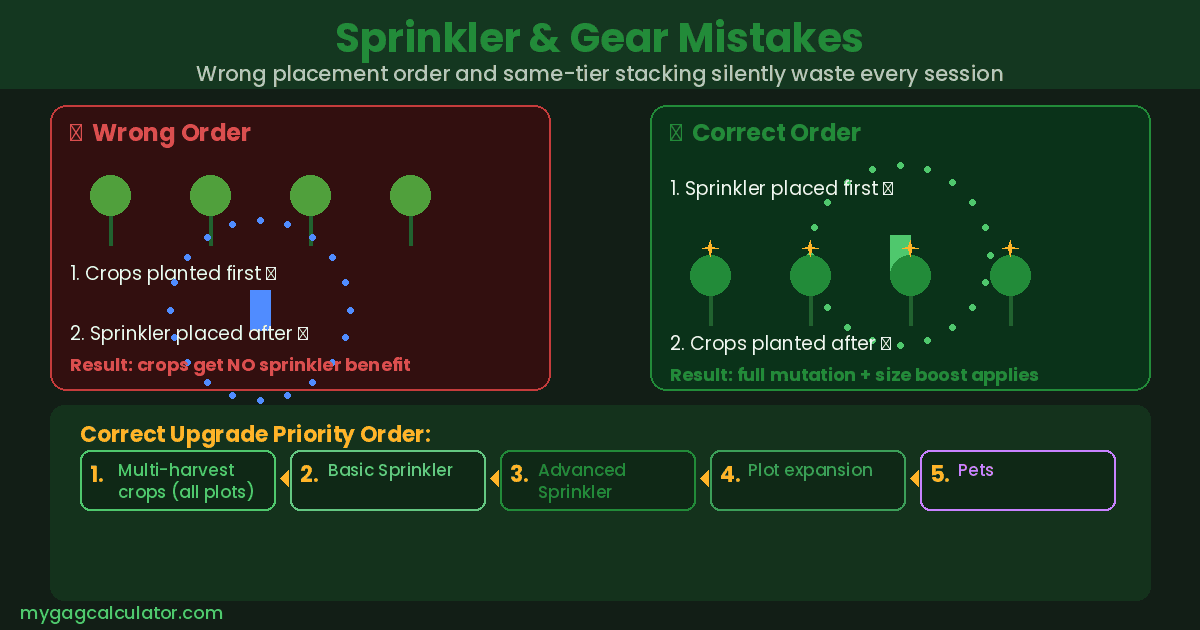
This is the gear mistake that costs the most money per session and is the least obvious to new players. Sprinklers in Grow a Garden only affect crops that are planted after the sprinkler is already in position. A crop planted before its sprinkler is in place receives no benefit from that sprinkler, even if the sprinkler is placed directly next to it afterward.
The correct sequence every single session is: sprinklers down first, crops planted second. This applies to every session, including returning from AFK. If a sprinkler is moved, any crop planted before the move does not retroactively benefit from the new position.
Make it muscle memory. The first action in every garden session is checking that sprinklers are in position. The second is planting. This order never reverses.
Mistake 15: Stacking Two Sprinklers of the Same Tier
Two Godly Sprinklers placed in the same garden provide no more benefit than one Godly Sprinkler. Each sprinkler tier stacks with different tiers, not with copies of itself. Placing a second identical sprinkler is dead Sheckle expenditure.
The correct method, often called the Sprinkler Method, is placing one of each tier: Basic, Advanced, Godly, Master, and Grandmaster. Each adds a different layer to the mutation probability and fruit size calculation. The complete gear list explains what each sprinkler tier contributes.
Mistake 16: Wrong Upgrade Priority — Sprinklers Come First
New players frequently spend their first meaningful Sheckle accumulation on pets, plot expansion, or premium tools before buying their first Advanced or Godly Sprinkler. This is the wrong order.
Sprinklers pay for themselves within a small number of harvests by increasing both fruit size and mutation probability. A Godly Sprinkler placed on a strong crop recovers its cost faster than any pet purchased at the same budget level. The correct priority sequence is: multi-harvest crop coverage, then sprinklers starting from Basic, then plot expansion when all existing plots are full, then pets after crop and sprinkler infrastructure is stable.
Using a Godly Sprinkler on carrots or other low-value crops is a related error. The mutation multiplier and size boost apply to whatever is planted underneath the sprinkler. Pairing a high-tier sprinkler with a low-value seed wastes the sprinkler’s potential. Match sprinkler tier to crop value.
Mistake 17: Ignoring the Lightning Rod and Star Caller
Both the Lightning Rod and the Star Caller are gear items that directly influence which mutations appear during events. The Lightning Rod attracts Thunderstorm lightning strikes to specific garden positions, guaranteeing that those crops receive the Shocked mutation (100x) during a storm. The Star Caller performs the same role for Meteor Shower events, directing Celestial mutations (120x) to placed crops.
Neither tool works retroactively. Both must be placed before the event begins. A Lightning Rod placed after a Thunderstorm has already started will not redirect the storm’s mutations. The fix is to place both tools at the start of every session and leave them positioned throughout, even when no event is active, so they are ready when one begins.
For the full breakdown of the Shocked mutation mechanics and Lightning Rod placement strategy, the Shocked mutation guide covers everything in detail.
Pet Mistakes
Mistake 18: Buying Pets Before Crop Income Is Stable
Pets are powerful, but they are not the first investment to make. A player who spends their first 50,000 Sheckles on a Common Egg rather than an Advanced Sprinkler has made a trade that will cost them across every subsequent session. The sprinkler compounds. The pet, without the sprinkler foundation below it, is running on a smaller base than it could be.
The fix is sequencing. Establish multi-harvest crop coverage across all available plots. Buy sprinklers in tier order. Then purchase pets once crop income can sustain both the running costs of plot management and the pet acquisition without destabilising the Sheckle balance.
Mistake 19: Running the Monkey Pet With Mutation Pets
This is the single most destructive specific pet-synergy mistake in the game, and it receives almost no clear warning on any competitor page.
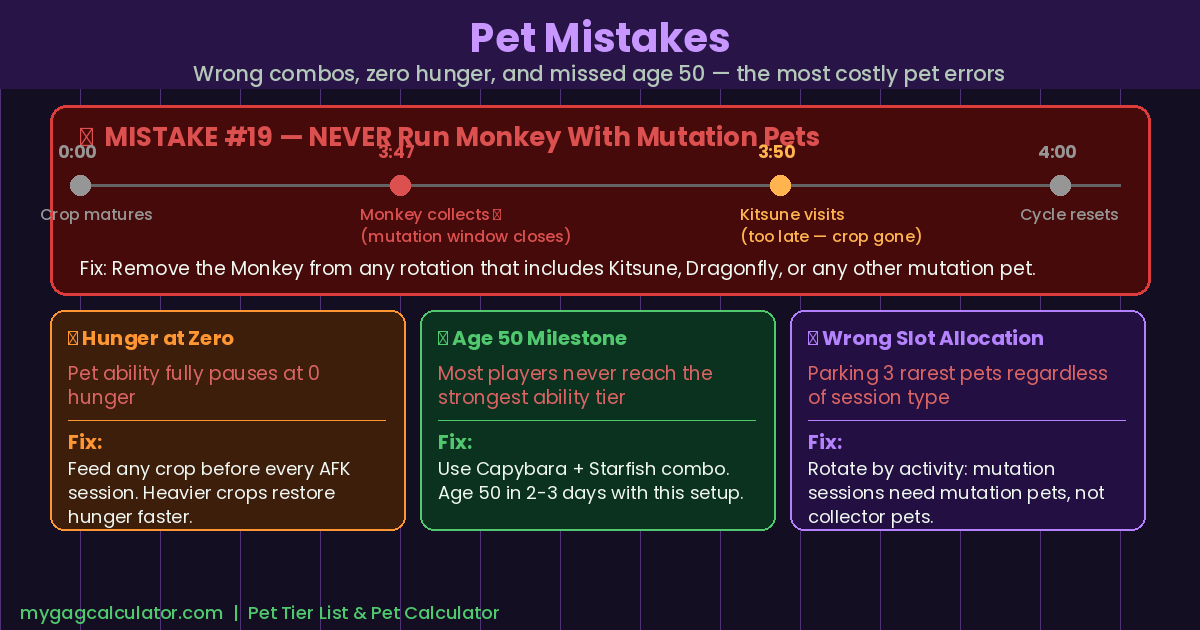
The Monkey pet auto-collects ripe fruit on a timer. Mutation pets like the Kitsune and Dragonfly visit crops on their own timer to apply Gold or Rainbow mutations. When the Monkey collects a ripe fruit before the Kitsune or Dragonfly has visited that cycle, the mutation window closes. The mutation is lost.
A concrete example: the Monkey collects a mature crop at 3:47 into a growth cycle. The Kitsune would have visited at 3:50. Those three minutes are the difference between a base-value harvest and a 20x or 50x multiplied harvest. Run across hundreds of cycles, the Monkey actively prevents the mutation pet from functioning.
The rule is absolute: never run the Monkey pet in the same slot rotation as any mutation pet. Monkey belongs in convenience-only setups where mutations are not being farmed.
For the full breakdown of which pet combos produce the best mutation farming results, the pet tier list ranks every pet with specific combo recommendations.
Mistake 20: Ignoring Pet Hunger and the Age 50 Milestone
Two pet management errors quietly suppress garden performance across every session:
- Hunger at zero: A pet whose hunger stat reaches zero stops using its ability. It is present in the slot but functionally inactive. Feeding pets any harvested crop restores hunger. Heavier and rarer crops fill hunger faster. Sugar Apple is frequently cited as one of the best hunger recovery options. The fix is to check pet hunger before any long AFK session and feed before going offline.
- Age 50 milestone not reached: Pet abilities in Grow a Garden scale with age. The age 50 milestone unlocks the strongest version of a pet’s ability, described by experienced players as a significant jump in output. A pet traded or used without reaching age 50 is leaving its potential unrealised. The Capybara and Starfish combo is one of the fastest-cited methods for reaching age 50, with some players reporting the milestone within 2 to 3 days of consistent play. For players prioritising trading, note that pet trade value at age 50 differs substantially from age 1.
The Pet Calculator and the pet abilities guide cover hunger rates and age scaling in detail for every pet in the game.
Mistake 21: Wrong Pet Slot Allocation
Three active pet slots are available in the base game. Most new players fill all three with the rarest pets they have acquired without considering what each pet actually does during the current session type.
The correct approach is to rotate pets based on the activity. Mutation farming sessions need mutation pets. Harvest-speed sessions need collector pets. XP farming sessions need XP booster pets. Parking the same three pets regardless of session type leaves a significant portion of each pet’s specialised value on the table.
One slot is commonly described as non-negotiable for long sessions: the Capybara. Its passive ability to accelerate pet aging makes it a high-value companion for any extended play period, regardless of what else the session involves.
Daily Quest and Event Mistakes
Mistake 22: Ignoring Raphael and the Daily Quest System
The Raphael NPC stands behind a small stand with a “Quest Giver” sign. Three quests refresh each day. Completing them rewards a Gardener Seed Pack, which carries a roughly 22% chance of containing a Mint seed alongside other useful drops.
For free-to-play progression, daily quests are one of the most consistent seed pack sources in the game. Players who skip them are passing on free inventory upgrades across every session. Some quests require harvesting rare crops, which is why keeping a reserve of rare seeds in inventory is valuable. Plant them before checking quests, not after. The NPC guide covers all permanent and event NPCs with locations and reward tables.
Mistake 23: Missing Admin Abuse Events Entirely
Admin Abuse is one of the highest-value recurring events in Grow a Garden, where the development team triggers extended weather events, seed drops, and special sessions. Players who are not prepared for it or who miss it entirely lose access to one of the biggest Sheckle and mutation opportunities on the calendar.
The five most common Admin Abuse mistakes, and their fixes:
- 1. Discord notifications are off. The only reliable way to know an Admin Abuse session is starting is through community notification in the official Discord. Without notifications enabled, there is almost no warning. The admin events schedule explains the typical timing and what to expect.
- 2. No Sheckles ready. Rare seeds and special gear appear during Admin Abuse sessions. Players with empty wallets when the session starts cannot buy them. Maintain a reserve balance at all times.
- 3. Plots are full of low-value crops. Admin Abuse sessions drop high-value mutations across the garden. Having plots occupied by carrots during a session is a lost opportunity. Clear or shovel low-value crops before a session when possible and leave plots available for valuable drops.
- 4. Sprinklers are not placed. Sprinklers need to be in position before the session starts to benefit crops during the event mutations. Setting up sprinklers after Admin Abuse has already triggered costs mutation potential.
- 5. Wasting session time at the event shop. The seed shop and gear shop are the priority during Admin Abuse. Event shop items can be acquired separately. Rare seeds and gear that appear during the session window are the highest-value purchases and should be the first stop, not the last.
The Saturday Admin Abuse guide has a full prep checklist for every session type.
Mistake 24: Missing Limited-Time Events and Their Seeds
Seasonal and limited event seeds in Grow a Garden do not return. Once an event ends, its exclusive seeds are gone from the standard pool. Players who miss an event miss those seeds permanently, which has direct consequences for trading value and mutation farming capability in future sessions.
The fix is to join a community notification server that alerts when rare seeds appear in the shop and when events are active. Beyond Discord, checking the Weather Tracker regularly helps players anticipate incoming weather events so they can prepare crops accordingly rather than reacting after the event has already started.
Trading Mistakes
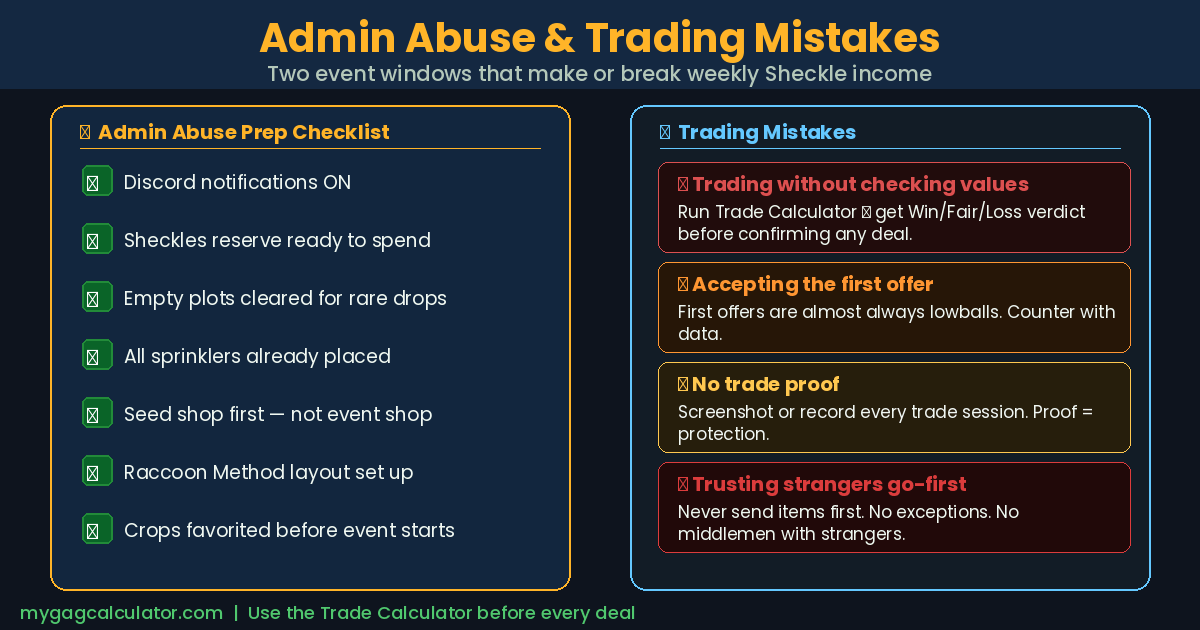
Mistake 25: Trading Without Checking Crop Values
Trading in Grow a Garden without verifying what both sides of the trade are worth is how beginners lose significant value to experienced traders. This is not always malicious. Sometimes both parties genuinely do not know the correct value. The outcome is the same: one party receives substantially less than what they gave.
The Trade Calculator calculates Win/Fair/Loss verdicts in real time. Add the items from both sides, see the total value of each side, and receive a clear verdict before confirming anything. Using it before every trade is not optional for anyone who wants to avoid leaving value on the table.
The community value list is an important secondary check. Current market prices for specific mutations and rare crops shift with updates, and the Trade Calculator is maintained to reflect those shifts. Running a quick check before a trade takes less than a minute and prevents mistakes that can cost millions of Sheckles.
Mistake 26: Accepting the First Trade Offer
The first offer in almost every trade negotiation is a lowball. This is not unique to Grow a Garden. It applies to any market with imperfect information. The player who offers first often does so at a price that favours them, expecting the counter.
The fix is to never offer first and to always counter the first incoming offer with a cross-check against current values. A counter-offer grounded in accurate data is a legitimate trade position, not an unreasonable demand. The scam prevention guide covers the full range of trading risks, from lowball offers to more aggressive manipulation tactics.
Mistake 27: Trading Without Proof
Every trade in Grow a Garden should be recorded. A screenshot of the trade screen before confirmation, or a short video of the session, provides protection if a dispute arises. The trading community is large and largely self-regulated, which means proof is the primary recourse when something goes wrong.
Recording trades also builds a reference log. A player who tracks what they traded, at what value, and with which players develops a sense of the market over time that provides a compounding advantage in future trades.
Advanced System and Mindset Mistakes
Mistake 28: Treating Grow a Garden as a Spam-Click Game
The most fundamental mistake is the one that drives all the others: treating Grow a Garden like a clicker game where faster action produces better results.
The game rewards patient investors, not frantic harvesters. Batch actions are more efficient than constant individual harvests. Holding crops for mutation windows is more profitable than selling at first maturity. Planning upgrade sequences produces more output than impulsive spending. The players who progress fastest think in sessions and cycles, not individual clicks.
Building this mindset is the underlying fix for most of the mistakes in this guide. Each specific error is a symptom of the same root cause: prioritising immediate action over planned position.
Mistake 29: Missing the Raccoon Method Garden Layout
The Raccoon is one of the most powerful pets in the game when used correctly and one of the most wasted pets when used incorrectly. Most players who own a Raccoon either use its duplication ability on common seeds or activate it at random on whatever crop happens to be nearby.
The correct application is the Raccoon Method. Plant a single high-value crop in the centre of the garden, surround it with low-rarity crops like carrots, and use the Raccoon’s duplication at the moment a premium seed is purchased. A seed worth 50 million Sheckles, duplicated at acquisition, produces 50 million Sheckles of instant additional value. Using the same duplication on a 200-Sheckle carrot produces 200 Sheckles. The difference is planning, not luck.
The Raccoon guide covers the full method including the garden layout and the mutation transfer strategy with the T-Rex and Spinosaurus pets during Admin Abuse sessions.
Mistake 30: Not Server-Hopping for the Egg Shop
The egg shop does not show the same inventory on every server. Rare eggs rotate on approximately a 30-minute cycle. Players who check one server and leave when the visible eggs are Common or Uncommon miss the opportunity to find Mythical or Legendary eggs on a different server running on a different rotation point.
The fix is deliberate server-hopping: leave a server, join a new one, check the egg shop, repeat. This takes two or three minutes per cycle and meaningfully increases the odds of encountering high-tier eggs without waiting through a full rotation on a single server. The eggs list and shop guide has the full breakdown of what each egg tier contains and which are worth prioritising. Use our GAG1 egg calculator for egg odds and hatch simulation.
Mistake 31: Cluttering the Garden With Outdated Crops
Every plot is income capacity. A plot occupied by a crop that was relevant two weeks ago but has since been outclassed by available alternatives is a plot that is not earning at its maximum potential.
The shovel tool removes crops permanently. New players are sometimes hesitant to use it, either because the crop cost something or because they are uncertain what to replace it with. Both concerns are understandable and both lead to the same outcome: a garden full of crops that are earning below the current optimum. The fix is regular crop rotation. Evaluate the garden against the current seed shop every few sessions and use the shovel to clear any plot that could be running a meaningfully better crop.
Already Playing GAG1? Do Not Carry These Mistakes Into Grow a Garden 2
Grow a Garden 2 launched in June 2026 and kept the core farming loop intact, but added systems that change how every mistake above plays out. Night stealing means leaving high-value crops unharvested at the end of a session now carries a real cost. The guild competition system rewards players who optimise at a level that requires avoiding the fundamental errors from GAG1 first.
Players transitioning from GAG1 carry a dangerous assumption: that the muscle memory built in the original game transfers cleanly. Some of it does. The mutation and sprinkler principles are consistent. But the night cycle, the Fruit Stock penalty system, and the defensive crop mechanics in GAG2 introduce new failure modes for players who arrive with veteran confidence but do not pause to learn what changed.
The GAG2 beginner guide covers every new system from the first seed purchase through to guild competition strategy. Starting there before applying GAG1 habits to GAG2 prevents the most common transition mistakes.
What All These Mistakes Have in Common
Looking across every category in this guide, a pattern emerges. The most costly errors share the same root: treating Grow a Garden as a passive, reactive game rather than an active economy.
Idle Sheckles and empty plots are not small inefficiencies. They are a signal that the garden is not being managed as a compounding system. Harvesting during weather events is not impatience. It is a misunderstanding of how the mutation economy actually works. Running the wrong pet combo is not a minor oversight. It is leaving the game’s highest-multiplier mechanics inactive.
The players who scale from early-game struggles to billions of Sheckles are not the ones who got luckier with rare seeds. They are the ones who stopped thinking about the next harvest and started thinking about the next cycle, the next event, and the next reinvestment decision. Every tool on this site exists to support exactly that kind of thinking: the Mutation Calculator for pre-harvest planning, the Profit Calculator for crop-by-crop income comparisons, the Trade Calculator for every deal before it is confirmed.
Avoiding the mistakes in this guide will not guarantee reaching the top of the leaderboard. It will guarantee not being held back by errors that are entirely within control.
Frequently Asked Questions
What is the single biggest mistake in Grow a Garden?
Staying on carrot seeds past the first few minutes of play. Carrots are single-harvest, low-value crops. Every session spent planting them past the early game delays access to multi-harvest crops that compound income across every cycle.
Should I harvest crops during a Thunderstorm in Grow a Garden?
No. A crop must be in the ground when a weather event lands for the mutation to apply. Harvesting during a Thunderstorm removes the crop from the mutation window entirely. Always wait until the event ends before harvesting.
Is it a mistake to stack two Godly Sprinklers in Grow a Garden?
Yes. Two sprinklers of the same tier provide no additional benefit over one. Each tier of sprinkler stacks with different tiers, so placing one of each tier is the correct method, not duplicating the same one.
Can the Monkey pet be used alongside mutation pets in Grow a Garden?
No. The Monkey pet auto-collects ripe fruit before mutation pets like the Kitsune or Dragonfly have cycled. This breaks the mutation window and causes the player to miss the mutation entirely, which can mean the difference between thousands and billions of Sheckles.
What happens when pet hunger reaches zero in Grow a Garden?
The pet’s ability pauses completely. A hungry pet is an inactive pet. Feed pets any crop before long AFK sessions to keep their abilities running.
Where is the Quest NPC in Grow a Garden?
The Quest NPC is Raphael, found behind a small stand with a “Quest Giver” sign. He offers three daily quests that reward Gardener Seed Packs, which carry roughly a 22% chance of containing a Mint seed.
What should players do during Admin Abuse in Grow a Garden?
Players should visit the seed shop and gear shop first, not the event shop. Empty plots should be filled before the session starts. Sprinklers should already be placed. Discord notifications should be enabled so the event is never missed.
Is spending Robux on the seed shop refresh a mistake?
Yes. The seed shop restocks on its own every 5 minutes at no cost. Refreshing with Robux almost never provides high-value seeds and is the worst Robux expenditure in the game. If Robux is spent at all, the Grandmaster Sprinkler provides far better value.