Published by: Saif (May 2026) | Platform: Roblox | Game: Grow a Garden
Growing giant crops in Roblox Grow a Garden is not a matter of luck. It is a controlled system built around crop weight, sprinkler management, and the right pet combinations. Every oversized harvest a player sees in someone else’s garden follows the same set of rules, and those rules are learnable.
In this game, crop weight directly determines Sheckle value at harvest. A heavier crop is worth more, and the methods that produce heavier crops are well-documented by the community. This guide covers the weight formula, every sprinkler tier, the pets that genuinely move the needle, the buff dilution problem almost no guide explains properly, and the setups that work for both active play and AFK sessions.
| Grow a Garden giant crops are high-weight fruits grown by stacking sprinklers before planting, using size-boosting pets like the Moon Cat and Brontosaurus, and planting one crop at a time to prevent buff dilution. Crop weight multiplies Sheckle value directly using the formula: Crop Value = Base Price per kg x Weight (kg). The heavier the crop, the higher the payout. |
What Actually “Grow a Garden Giant Crops” Means
The phrase “giant crops” is used in three different ways in this community, and mixing them up causes real confusion:
- High-weight, oversized fruits grown through sprinklers and pets. This is the primary meaning and the focus of this guide. Crop weight directly scales Sheckle value, so players actively chase heavy harvests.
- The Giant mutation, an Uncommon-rarity crop mutation that requires planting a 3×3 grid of the same crop type. This is a separate mechanic and is covered in its own disambiguation section below.
- Pets with “Giant” in their name, including Giant Scorpion, Giant Ant, Giant Hazehound, and Giant Ash Raven. These are distinct units and have no direct connection to crop size.
It is also worth noting that Huge, Titanic, and Godly are pet weight classification tiers, not crop-related terms. When a guide mentions a “Huge pet,” it is describing that pet’s hatch weight bracket, which is an entirely separate system from crop size.
Crop size and crop weight are also not the same thing. Crop size is visual. A crop that looks larger on screen correlates with being heavier, but the number that matters at the merchant is weight in kilograms, not the visual scale. Both terms get used interchangeably in the community, but weight is what controls Sheckle payout. See our guide on all crops in grow a garden.
How Crop Weight Controls Sheckle Value (The Formula)
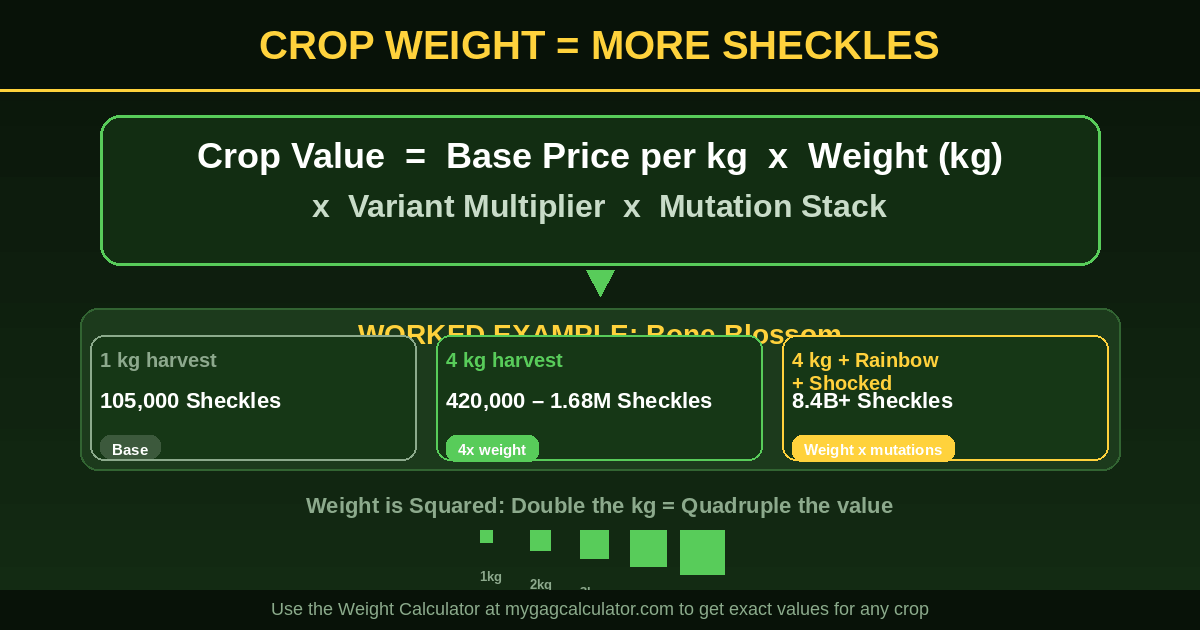
This is the most important mechanic to understand before setting up any giant crop strategy. The formula the game uses to calculate a crop’s sell price is:
Crop Value = Base Price per kg x Weight (kg)
Mutations stack on top of this base calculation, but weight itself is the foundation. Some community sources and calculators describe the relationship as weight squared, meaning a crop that is twice as heavy can be worth four times as much. The practical takeaway is the same: even a modest increase in kilograms produces a noticeable jump in Sheckle value.
To illustrate: a Bone Blossom with a base value of 105,000 Sheckles at 1 kg sells for roughly 105,000 Sheckles. At 4 kg, depending on the exact formula implementation, that same crop can approach 420,000 to 1,680,000 Sheckles before any mutation is applied. That is why weight optimization is discussed so frequently in high-level farming circles. See how to farm sheckles fast.
Every crop also has a base weight and a weight cap. Higher-rarity crops, particularly Divine and Prismatic seeds, have higher base weight potential and higher caps, which is why they respond so well to giant crop setups. Common crops hit their ceiling faster and return less value for the same setup investment.
| Tip: Use the free Grow a Garden Weight Calculator to enter any crop and weight and instantly see the exact Sheckle value. It applies the correct formula automatically, which saves a lot of manual math before deciding whether to harvest. |
Sprinkler Stacking: The Foundation of Every Giant Crop Setup
Sprinklers are the core tool for producing oversized crops. Watering increases crop size during growth, and each sprinkler tier has its own timer and radius. Stacking all available tiers together keeps the crop watered for as long as possible, maximising the weight it accumulates before harvest.
Sprinkler Tiers
| Sprinkler | Rarity | Approximate Duration | Shop Restock Chance |
| Basic Sprinkler | Common | Around 2 minutes | Always in stock |
| Advanced Sprinkler | Legendary | 5 minutes | 30% |
| Godly Sprinkler | Mythical | 5 minutes | 5% |
| Master Sprinkler | Divine | 10 minutes | 1.4% |
| Grandmaster Sprinkler | Divine+ | Longest available | Rare |
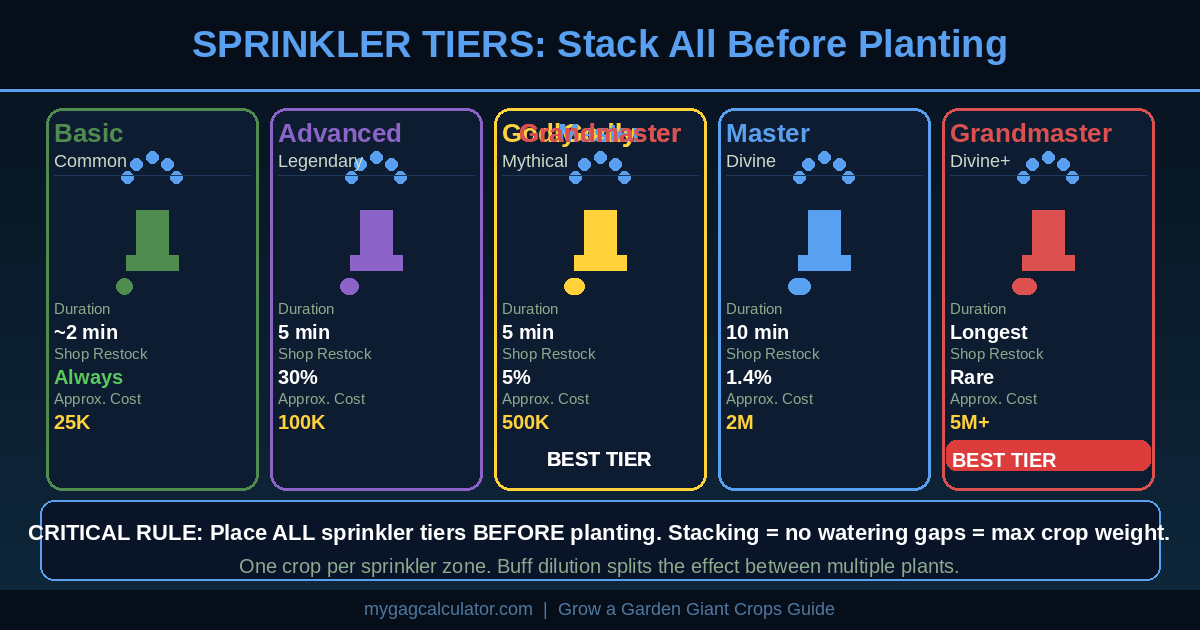
The sprinklers are purchased from Eloise at the Gear Shop. Stock rotates every five minutes globally, so checking back frequently is necessary when building toward a Master or Grandmaster setup.
How to Stack Sprinklers Correctly
- Clear the plot completely before planting. Remove any other crops in the area.
- Place all available sprinkler tiers, Basic, Advanced, Godly, Master, and Grandmaster if owned, around the target plot before inserting any seeds.
- Check that the target planting spot falls within the radius of every sprinkler placed.
- Plant the seed. The crop will immediately receive watering from all active sprinklers.
- Monitor sprinkler timers. When one stops, replace it immediately to avoid gaps in the watering cycle.
- Never replant mid-growth. Doing so resets all size progress completely.
The most common mistake is placing sprinklers after planting. Once the seed is in the ground, any sprinkler added can still water the crop, but the initial growth phase that determines base size is already underway. Stacking before planting gives the crop the highest possible exposure from the first moment.
Watering Can and Sprinkler Glitch
The Watering Can applies a puddle effect that boosts crop size on use. For players without access to high-tier sprinklers, manual watering is a valid fallback. It requires active play but costs nothing after the initial purchase from Eloise.
A method that has circulated in the community, and which has not been patched, involves placing sprinklers on an empty plot before any seed is inserted. This can cause unusually large fruits to appear, including oversized Moon Mangos and Golden Rosy Delights. It appears to interact with how the game initialises watering buffs at planting time. See our guide on Grow a Garden watering wednessday.
| Note on mutation-specific sprinklers: The Berry Blusher Sprinkler, Chocolate Sprinkler, and Honey Sprinkler apply specific crop mutations (not size boosts) when used. They are separate from the size-focused sprinklers covered in this section. |
Buff Dilution: The Rule Almost No Guide Explains
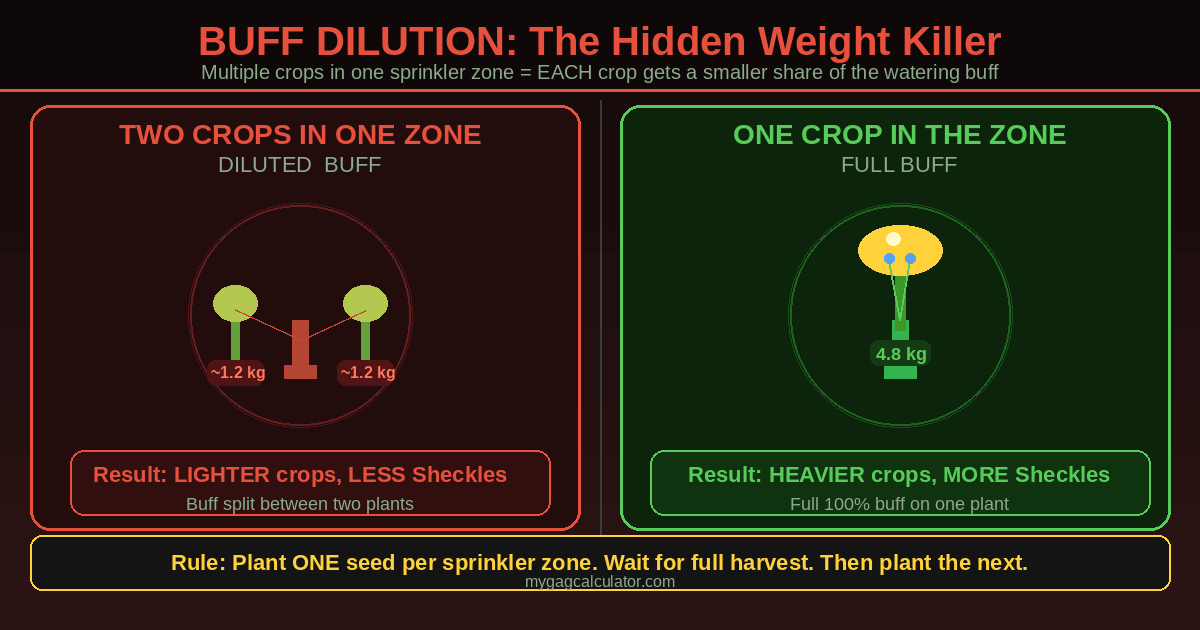
Buff dilution is arguably the single most actionable concept in giant crop farming, and it is almost never explained mechanically in existing guides. Players are told to “plant one crop at a time” but rarely understand why.
Each sprinkler has a fixed radius. When two or more crops fall inside that radius simultaneously, the watering effect is divided between them. Each individual crop receives a smaller share of the buff than it would if it were the sole crop in range.
The practical effect: two crops sharing one sprinkler do not each get the full watering benefit. They split it. The result is that both crops end up lighter at harvest than one crop grown alone under the same sprinkler stack would have been.
The solution is straightforward. Plant a single seed in the centre of the sprinkler cluster. Let it grow to full size and harvest it before planting the next seed. This approach takes longer in terms of total throughput but produces consistently heavier individual harvests, which is the goal when the aim is maximum Sheckle value per crop.
Buff dilution applies to pet effects as well. Multiple crops inside a Moon Cat’s nap zone share the size benefit proportionally. One crop per active zone is the efficient choice.
Best Pets for Growing Giant Crops
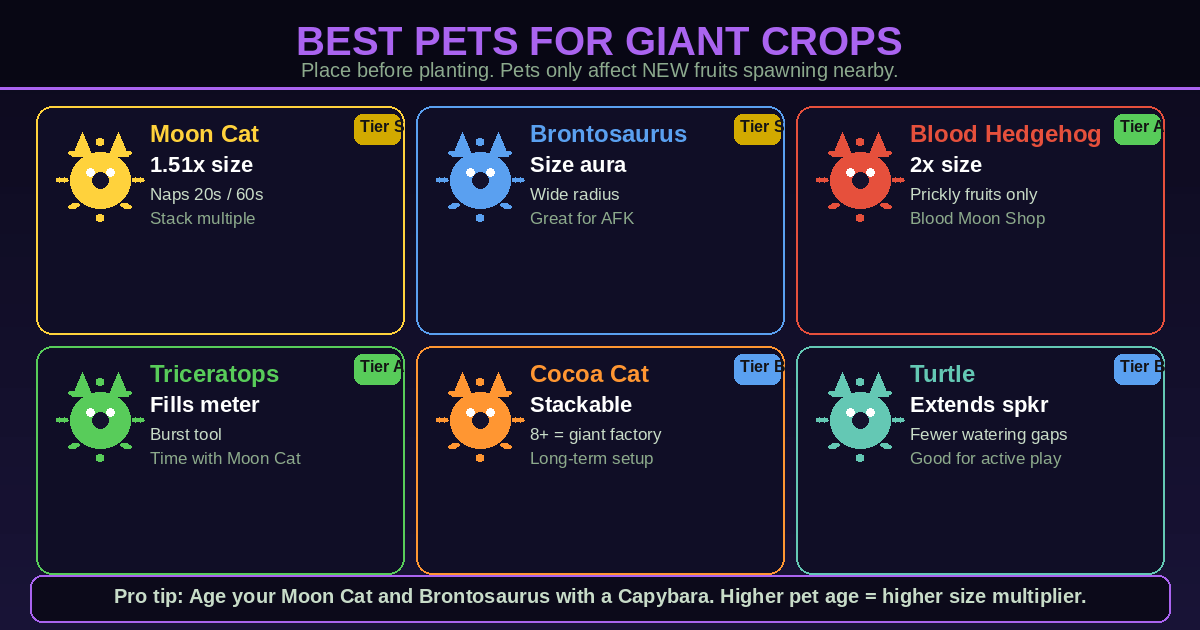
Several pets in the game exist specifically to boost crop size. They only affect fruits that spawn while the pet is active and nearby. Pets placed after a fruit has already appeared on the plant do not retroactively affect its size.
Primary Size-Boosting Pets
| Pet | Size Effect | Notes |
| Moon Cat | 1.5x size multiplier on new fruits within 20 studs | Naps every 60 seconds for approx 20 seconds. Fruits spawning during the nap window grow larger. Stack multiple Moon Cats to increase coverage. |
| Orange Tabby | Size bonus on fruits while napping nearby | Lower-tier alternative to Moon Cat. Useful early-game or as a second nap-zone pet. |
| Blood Hedgehog | 2x size + 1.17x variant bonus | Works specifically on prickly fruits: cactus, pineapple, durian, dragonfruit. Obtained from the Blood Moon Shop. |
| Hedgehog | 1.51x size bonus on spiky fruits | Covers cactus, durian, and dragonfruit. Less powerful than the Blood Hedgehog but easier to obtain. |
| Brontosaurus | Passive size aura across a large radius | Strong AFK companion. Pair with Moon Cat for overlapping zone coverage. |
| Triceratops | Instantly fills the growth meter of a nearby crop | Use this immediately after a Moon Cat nap begins to lock in the largest possible fruit during the active buff window. |
| Turtle | Extends sprinkler duration | Reduces the frequency of gaps in the watering cycle. Pairs well with active sprinkler management sessions. |
| Cocoa Cat | Stackable size multiplier | At 8 or more Cocoa Cats in the same zone, the stacked effect creates consistently oversized harvests across extended AFK sessions. |
How Pet Aging Affects Size Multipliers
All size-boosting pets scale with age. A Moon Cat at age 1 applies the base 1.51x multiplier. At higher ages, the multiplier increases. Aging pets to level 50 is a significant investment, but the payoff in per-harvest weight is real. The Capybara pet accelerates other pets’ progression to level 50, making it a strong support pick for any setup centred on aged size-boosting pets.
Check exact pet values, ability cooldowns, and level-up multipliers using the Grow a Garden Pet Calculator, which covers all 330+ pets with full ability and age data.
Pet Mutations That Affect Size
Pet mutations are separate from crop mutations. Several pet mutations change how a pet appears and how large it grows:
- Mega: increases pet size by 200% but accelerates hunger drain significantly
- Tiny: reduces size by 90% and slows hunger drain by 20%
- Jumbo: increases size and boosts XP gain
- Giantbean: available through a special shard recipe only, accelerates hunger by 15% but adds XP per second from planted beanstalks
- Nightmare: +125% size plus a passive ability boost
- GiantGolem: applies a +20% weight modifier to the pet
These pet mutations affect the pet itself, not the crops it supports. They are mentioned here because searches for “giant” often return results about these mutations, which creates confusion.
The Elephant and Crop Size: Clearing Up the Most Common Confusion
The Elephant is one of the most searched pets in the context of giant crops, and most guides get the explanation wrong. Here is the precise breakdown.
The Elephant’s Jumbo Blessing ability increases the base weight of pets. It does not directly increase crop weight. When the Elephant blesses a pet, that pet’s base weight at birth is raised, which matters significantly for pet trading and the Huge, Titanic, and Godly pet weight classification tiers. See complete breakdown of Grow a Garden elephant.
The connection to giant crops is indirect. A higher-weight pet can sometimes have stronger passive effects, and in setups built around pet synergies, an Elephant-blessed team performs better overall. But if the goal is maximising the weight of a specific crop at harvest, the Moon Cat, Brontosaurus, and Grandmaster Sprinkler stack are more direct tools.
Players who search “Elephant giant crops” are typically looking for one of two things:
- How to use the Elephant to improve their pet roster so those pets can grow larger crops, which the Jumbo Blessing indirectly supports
- A direct crop-size boost from the Elephant, which does not exist in the current game build
The most effective three-part setup for consistent giant crops is: Grandmaster Sprinkler (or maximum sprinkler stack) providing continuous watering, Moon Cat providing the 1.5x size multiplier during nap windows, and Brontosaurus providing a passive size aura across a wide radius. Integrating a Capybara to age the Moon Cat and Brontosaurus quickly, and a Peacock to reduce the Elephant’s blessing cooldown for improved pet roster management, rounds out a high-investment setup.
| Pet | Role in Setup | What It Actually Does |
| Elephant | Roster booster | Increases base weight of pet companions via Jumbo Blessing |
| Capybara | Levelling support | Speeds pet levelling to age 50 for higher multipliers |
| Peacock | Cooldown reduction | Shortens Elephant blessing cycle for faster roster improvement |
| Moon Cat | Direct size boost | 1.5x size multiplier on fruits during nap window |
| Brontosaurus | Area size aura | Passive size effect across a large plot radius |
| Grandmaster Sprinkler | Continuous watering | Longest sprinkler duration; keeps crop hydrated through full growth |
Best Seeds to Target for Giant Crop Farming
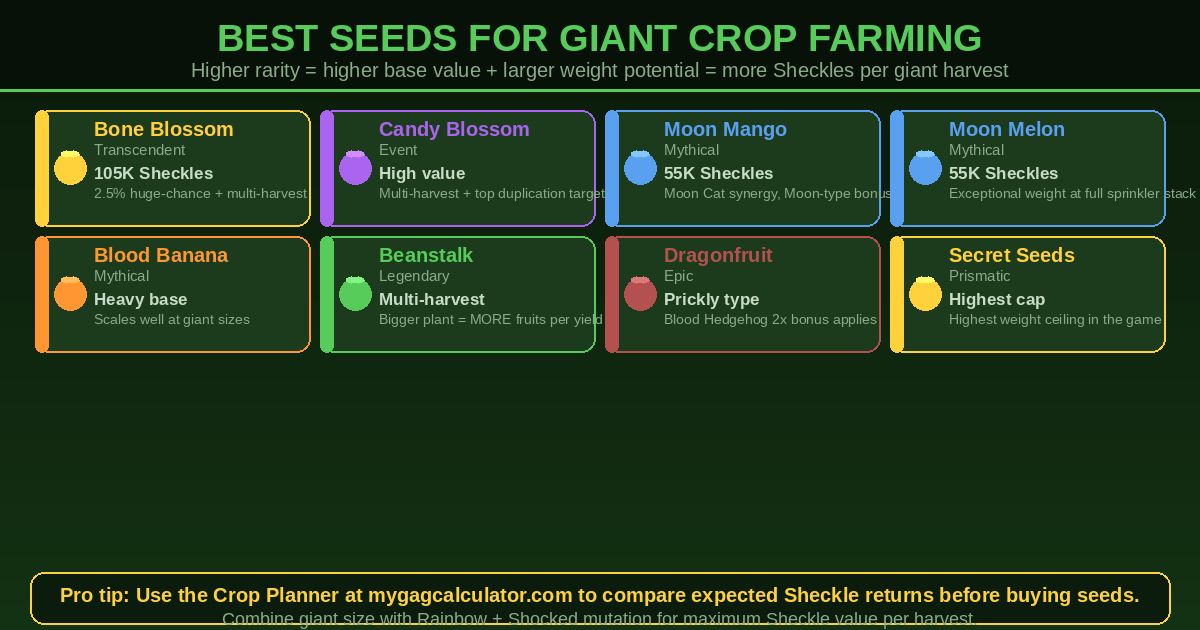
Higher-rarity seeds have higher base values and larger weight potential, which means the Sheckle return from a giant harvest is proportionally greater. The following crops are the most efficient targets for a dedicated giant crop setup:
| Crop | Rarity Tier | Why It Works for Giant Farming |
| Bone Blossom | Transcendent | 2.5% intrinsic huge-chance, multi-harvest, 105,000 base value. Responds well to Moon Cat and sprinkler combos. |
| Candy Blossom | Event | Multi-harvest with high base value. One of the most duplicated crops in the game for good reason. |
| Moon Mango | Mythical | High base value and strong synergy with Moon Cat nap timing. Moon-type fruit stays post-harvest at 6.1% chance. |
| Moon Melon | Mythical | Reaches exceptional weight with full sprinkler stacking. Consistent performer in active setups. |
| Blood Banana | Mythical | Heavy base weight potential. Scales well at larger sizes. |
| Dragonfruit | Epic | Prickly fruit type, which means Blood Hedgehog applies a 2x size boost. Solid value for mid-game players. |
| Beanstalk | Legendary | Unique property: larger plants produce more fruits per harvest. Giant Beanstalk multiplies both size and yield. |
| Giant Pumpkin | Seasonal | High base weight potential when available. Worth targeting during its active season. |
| Secret Seeds | Various | Prismatic and Divine Secret Seeds have the highest weight caps in the game. Priority targets for max-weight farming. |
Seeds are purchased from Sam at the Seed Shop. Divine and Prismatic seeds have low stock rates and high prices, so timing purchases around restock windows and using community stock trackers is standard practice.
Plan which seeds to plant each session using the Grow a Garden Crop Planner, which shows expected values and growth timelines before any seeds are purchased.
The Optimal Giant Crop Sequence (Active and AFK)
Active Method: Step-by-Step
- Clear the plot of all other crops. Buff dilution is the biggest hidden drain on crop weight.
- Place all available sprinkler tiers around the target planting spot, starting from the Grandmaster or Master and working down.
- Deploy the Moon Cat, Blood Hedgehog (if targeting prickly fruit), and Brontosaurus within overlapping range of the target spot.
- Plant the seed.
- Watch for the Moon Cat nap cycle. When the nap begins (roughly every 60 seconds), activate the Triceratops to instantly fill the growth meter during the nap window.
- Replace any sprinkler that expires immediately. Even a short gap in watering reduces the final weight.
- Harvest only when the crop reaches its heaviest point. Check the weight displayed in the inventory before selling.
- If running multiple sessions, rejoin the server after 90 minutes to refresh environmental conditions.
AFK Method: Overnight and Extended Sessions
AFK farming for giant crops works best with crops that have long growth times. Moon Melon, Beanstalk, and Blood Banana are strong choices because they require hours to reach full size, and an overnight session accumulates both maximum weight and passive weather mutations.
The AFK sprinkler method requires setting up all sprinkler tiers before leaving. Moon Cat nap windows will trigger automatically while away, and Brontosaurus will apply its passive size aura continuously. The key difference from active play is that Triceratops cannot be triggered manually, so the setup relies on passive size accumulation rather than burst-fill moments.
One additional benefit of long AFK sessions is weather exposure. Crops left in the ground overnight will pass through Rain (Wet mutation), Thunderstorms (Shocked mutation), Blood Moons (Bloodlit mutation), and Blizzards (Chilled mutation) without any input. These mutations stack on top of the weight-driven base value and can multiply the final Sheckle payout significantly.
For a full breakdown of AFK session setup, anti-AFK methods across all platforms, and the best pet loadout for overnight farming, see the Grow a Garden AFK Method guide.
To track upcoming weather events and plan planting sessions around the most valuable mutation windows, the Grow a Garden Weather Tracker provides real-time event data.
Combining Giant Crops with Mutations: The Maximum Value Setup
Crop weight and crop mutations are independent mechanics. They do not interfere with each other, and they multiply together to produce the final Sheckle value. A heavier crop with a high-tier mutation stack is significantly more valuable than either factor alone.
The game’s mutation formula is:
Final Value = Base Price per kg x Weight x Variant Multiplier x (1 + Sum of Mutation Multipliers – Number of Mutations)
Weight feeds into the Base Price per kg component. A crop that is twice as heavy contributes proportionally to the starting value before any mutation multiplier is applied. This means that getting a high-weight harvest before a Thunderstorm or Blood Moon event produces dramatically better results than harvesting at average weight and hoping for a mutation.
A practical example: a Bone Blossom at 4 kg with a Rainbow (x50) and Shocked (x100) mutation combination runs through the formula as follows. The base value scales with weight first, then the combined mutation multiplier is applied. The result is an order-of-magnitude increase compared to the same crop harvested at 1 kg with no mutations.
The goal for serious farmers is to reach maximum crop weight before any significant mutation event and then let the mutations stack on top during AFK sessions. Harvesting prematurely to capture a single early mutation sacrifices the weight multiplier that a longer grow would have provided.
Use the Grow a Garden Mutation Calculator to test any mutation stack before committing to a harvest decision. For full background on how mutations work independently of size, see All Mutations in Grow a Garden.
To run profitability projections across a full session, the Grow a Garden Profit Calculator factors in weight, mutations, friend bonuses, and crop type to show expected Sheckle totals before planting.
The Giant Mutation (3×3 Grid Mechanic)
The Giant mutation is an Uncommon-rarity crop mutation that is entirely separate from growing physically heavy crops. It requires a specific planting configuration:
- Plant exactly 9 seeds of the same crop type in a 3×3 square grid
- All 9 seeds must begin growing at the same time; stagger-planting causes the mutation to fail
- All 9 crops must maintain the same growth rate throughout the cycle
- Max Soil Quality, Max Water, and Max Fertilizer improve the chance, pushing it to around 20% under ideal conditions
- Use stone paths between separate grids to prevent crops from merging incorrectly
If conditions for both the Giant mutation and a higher-rarity mutation, such as Golden (Rare), are met simultaneously, the game resolves them in order from highest rarity to lowest. Golden takes priority over Giant. A crop cannot hold two mutations at once.
The Giant mutation produces a visually larger plant and a moderate value multiplier. It is not the same as growing a high-weight crop through sprinklers and pets, and the two terms should not be confused in setup planning.
Giant Crops and the Leaderboard
Crop weight has a direct role in the server leaderboard. Players are ranked by the weight of crops they have grown, so consistent giant crop farming is not only a money strategy; it is also a leaderboard strategy.
Aside from the ranking mechanic, large plants visible in a player’s garden attract passive interest from other players. A server where one player has consistently oversized Bone Blossoms or Moon Mangos becomes a target for Raccoon pets, which duplicate crops from nearby gardens. This creates a passive income loop for players who have Raccoons deployed and a secondary social economy benefit for the player with the large crops, since nothing is lost when a Raccoon duplicates a fruit.
World record and server-peak crop weights are discussed regularly in the official Discord community and on Reddit. The heaviest crops come from Divine and Prismatic seeds grown with the full sprinkler stack, aged Moon Cats, Brontosaurus aura, and long overnight AFK sessions.
Common Mistakes That Reduce Crop Weight
- Always stack sprinklers before inserting any seeds. The first moments of growth matter.: Placing sprinklers after planting
- Buff dilution is real and significant. One crop per active sprinkler cluster is the correct approach.: Planting multiple crops in one sprinkler zone
- This resets size progress entirely. Wait for the full harvest before replanting.: Replanting mid-growth
- The same nap window spent on a Moon Mango returns far more Sheckles than one spent on a Strawberry. Save limited pet buff cycles for high-value targets.: Using size pets on Common crops
- Weight is the multiplier. Every extra kilogram accumulated before harvest adds directly to Sheckle value. Patience is a strategy.: Harvesting too early
- An age-1 Moon Cat applies 1.51x. An aged Moon Cat applies a higher multiplier. Levelling the pets that matter is a long-term investment with compounding returns.: Ignoring pet age
- Environmental conditions, including weather patterns, can stagnate over very long sessions. A server rejoin refreshes the conditions.: Forgetting to rejoin the server after long sessions
- The Elephant’s Jumbo Blessing affects pet base weight, not crop weight. This is a common setup error that wastes an Ascension slot.: Treating the Elephant as a crop-size pet
Frequently Asked Questions
How do you get giant crops in Grow a Garden?
Giant crops are grown by stacking all available sprinkler tiers around a single planting spot before inserting any seeds, deploying size-boosting pets like the Moon Cat and Brontosaurus within range, and planting only one crop at a time to avoid buff dilution. Crop weight accumulates during growth and scales the Sheckle sell value directly.
What makes crops bigger in Grow a Garden?
Watering is the core driver of crop size. Sprinklers automate watering throughout the growth cycle, and higher-tier sprinklers water for longer. Pets like the Moon Cat apply a size multiplier to fruits that spawn during their nap windows. The combination of continuous sprinkler coverage and active pet nap timing produces the heaviest possible harvests.
How does crop weight work in Grow a Garden?
Each crop has a base weight when it spawns and accumulates additional weight while it continues to grow. Sprinkler watering, pet size effects, and extended grow time all contribute. The weight figure shown in the inventory is the number used in the sell-price formula. Higher weight equals higher Sheckle payout.
Does crop weight increase Sheckle value in Grow a Garden?
Yes. Crop value scales with weight using the formula: Crop Value = Base Price per kg x Weight (kg). Mutations apply on top of this base calculation. Weight and mutations are independent systems that multiply together, so maximising both produces the highest possible sell price.
What is the crop weight formula in Grow a Garden?
The core formula is: Crop Value = Base Price per kg x Weight (kg). Mutations are then stacked using: Final Value = Base Price x Weight x Variant Multiplier x (1 + Sum of Mutation Multipliers – Number of Mutations). The weight input comes directly from the crop’s current kg reading in the inventory.
What is the best sprinkler for giant crops in Grow a Garden?
The Grandmaster Sprinkler provides the longest watering duration of any single sprinkler and is the most effective individual tier for giant crop farming. For players who do not yet have a Grandmaster, stacking a Master, Godly, and Advanced Sprinkler together is the strongest practical alternative.
Should I stack sprinklers in Grow a Garden?
Yes. Each sprinkler tier runs on its own independent timer and radius. Stacking multiple tiers ensures the crop is continuously watered even when a lower-tier sprinkler expires. The critical rule is to place all sprinklers before planting so the crop receives the full buff from the first moment of growth.
How many crops should I plant at once for giant farming in Grow a Garden?
One. Planting multiple crops within the same sprinkler radius causes buff dilution, which reduces the per-crop watering effect and results in lighter harvests. For maximum weight on a single crop, it should be the only plant in the sprinkler coverage zone.
What pets make crops bigger in Grow a Garden?
The Moon Cat applies a 1.5x size multiplier to fruits spawning during its nap window. The Brontosaurus provides a passive size aura across a large radius. The Blood Hedgehog gives a 2x size bonus specifically to prickly fruits. The Triceratops fills the growth meter instantly, which can be timed with a Moon Cat nap. The Cocoa Cat is stackable and, at 8 or more units, creates consistent oversized harvests.
What does the Moon Cat do in Grow a Garden?
The Moon Cat naps for approximately 20 seconds every 60 seconds. Any fruit that spawns on a nearby plant while the Moon Cat is napping within a 20-stud radius grows at 1.51 times its normal size. Stacking multiple Moon Cats and overlapping their nap zones increases coverage and consistency.
Does the Elephant increase crop weight in Grow a Garden?
No. The Elephant’s Jumbo Blessing increases the base weight of other pets, not crops. It is a roster-building tool that improves the value of hatched pets for trading and pet weight tier classification. Crop weight is increased by sprinklers and size-boosting pets like the Moon Cat and Brontosaurus.
What is buff dilution in Grow a Garden?
Buff dilution occurs when two or more crops share the same sprinkler radius. The watering effect is divided between all crops in range rather than focused on one. Each crop receives a smaller proportion of the total buff, resulting in lighter harvests than a single crop would achieve alone under the same setup.
Can you grow giant crops while AFK in Grow a Garden?
Yes. AFK sessions work well for crops with long grow times, such as Moon Melon, Beanstalk, and Blood Banana. Set up the full sprinkler stack and deploy Moon Cat, Brontosaurus, and any other size pets before going AFK. Crops will accumulate weight passively and will also collect weather mutations during overnight sessions.
Do mutations affect crop weight in Grow a Garden?
No. Mutations and crop weight are independent systems. Mutations apply a value multiplier to the Sheckle sell price but do not change the physical weight of the crop. Growing a heavy crop and then letting mutations apply on top of it is the strategy that produces the highest combined Sheckle values.
Does the Grandmaster Sprinkler help grow giant crops?
Yes. The Grandmaster Sprinkler provides the longest continuous watering duration of any sprinkler tier, which reduces gaps in the watering cycle and gives the crop more total hydration time. It is the strongest single sprinkler for giant crop farming and pairs well with the full sprinkler stack for extended AFK sessions.
Does a friend boost affect crop size in Grow a Garden?
No. The friend bonus, provided by the Friendship Pot mechanic for connected friends, adds a percentage bonus to the Sheckle value at harvest. It does not affect the physical weight or size of the crop. Weight and mutations determine the base sell value; the friend bonus is applied on top as a separate multiplier.