Published by: Saif (Jun 2026) | Platform: Roblox | Game: Grow a Garden
| How to Level Up Fast in Grow a Garden
Grow a Garden has three separate leveling systems: Garden Guide XP (complete achievements and daily quests for player level rewards), Season Pass XP (finish six daily quests per session to climb tiers fast), and Pet Age leveling (keep hunger bars full and run Blood Owls or Capybaras as XP boosters to reach Age 50 for the Mutation Machine). Working all three at the same time is the fastest overall progression path in 2026. |
If the garden feels like it is barely moving no matter how long a player spends in it, the most common reason is that only one of the three leveling systems is being actively worked. Grow a Garden, the popular farming game on Roblox, tracks player progression across three completely separate systems: the Garden Guide achievement tree, the Season Pass quest loop, and individual pet aging toward Age 50 and beyond.
Most guides cover one in isolation. This updated 2026 guide covers all three, explains exactly which one to prioritize at each stage, and includes the specific pet setups and numbers that currently give the fastest results.
Wait: There Are Three Separate Leveling Systems in Grow a Garden

Before diving into methods, understanding what each system actually is saves a lot of wasted effort.
| System | What It Is | Main Reward | Priority Stage |
|---|---|---|---|
| Garden Guide XP | Achievement-based player level from the Garden Guide logbook. Tracks planting, harvesting, trading, and exploring. | Fence rewards, golden fence skin at level 50, seed packs, stat unlocks | All stages, but especially early game |
| Season Pass XP (Pass Points) | Six daily quests per day worth 250-400 Pass Points each. Climbing 50 tiers earns exclusive seeds, mutated pets, and cosmetics. | Exotic Prime Seed Packs, mutated pet rewards, premium cosmetics | Mid-game, especially during active seasons |
| Pet Age / Pet XP | Every pet has its own independent age/XP bar. Keeping hunger full and placing XP booster pets nearby raises it. Age 50 unlocks the Mutation Machine; Age 100 unlocks a permanent pet slot. | Mutation Machine access (Age 50), permanent extra pet slot (Age 100) | Ongoing, becomes critical mid-to-late game |
These three systems are connected in a loop. Higher Garden Guide level means better fence rewards and seed pack unlocks. Better pets from the Season Pass and Mutation Machine mean faster crop cycles. Faster crop cycles compound Sheckle income, which funds sprinkler upgrades, pet treats, and eggs that accelerate all three systems simultaneously. Getting all three moving at once is what separates fast progressors from players who feel stuck.
System 1: Garden Guide XP and Season Pass Tiers
What Is the Garden Guide?
The Garden Guide, sometimes called the logbook in older community posts, is the in-game achievement and progression tracker accessible from the main menu. It has two tabs: the Player tab, which shows overall Garden Level and XP progress, and the Achievements tab, which lists every milestone the game tracks. Completing each achievement gives a direct chunk of Garden XP. The Garden Guide was added in Update 1.19.0 and remains one of the most underused XP sources in the game.
Garden Guide level unlocks fence rewards at major milestones. The golden fence skin unlocks at level 50, and the Statue of Achievement is one of the visible endgame flex rewards. Checking the Achievements tab at the start of every session and finishing the milestones closest to completion is the most efficient use of time for Garden XP.
Season Pass: Daily Quests and Pass Points
The Season Pass is a separate progression track from Garden Guide XP. Players earn Pass Points by completing daily quests, which reset every 24 hours. In the current Season Pass structure, there are six quests available per day. Quests reward between 250 and 400 Pass Points each. The Season Pass has 50 tiers and is free for all players, meaning free-to-play accounts can reach Tier 50 without spending any Robux if daily quests are completed consistently.
| Season Pass Math
If the pass requires 100,000 total Pass Points to reach Tier 50 and each day offers roughly six quests at an average of 325 Points each, that gives approximately 1,950 Points per day. A 50-day season completed at that rate gives a free player enough to max the pass. Missing days requires catching up, but the daily quest volume is designed to allow free completion. |
The Season Pass premium upgrade (currently 749 Robux) unlocks additional tier rewards but does not affect the speed of XP gain. Free players and premium players earn Pass Points at the same rate. The value of the premium upgrade comes from exclusive seeds, mutated pets, and the Exotic Prime Seed Pack rewards unlocked at higher tiers, not from any progression speed advantage.
How to Maximize Garden Guide and Season Pass XP Fast
- Complete daily quests first every session. Six quests per day, reset every 24 hours. Examples include harvesting tropical plants, selling a set quantity of crops, or visiting another player’s garden. None typically take more than ten minutes each. Treating them as optional is the single biggest mistake for Season Pass progression.
- Check the Garden Guide Achievements tab before farming. Look specifically for achievements sitting near the completion threshold. Finishing five or six of those in one session can push one or two full Garden Levels without any extra effort.
- Blueberry seed strategy. Blueberries are a fast multi-harvest crop that can generate five mutations in a single session when weather events align. Season Pass quests often reference harvesting mutated crops, and blueberries deliver the volume needed to complete those faster than almost any other crop. The ‘harvest 50 mutated blueberries’ achievement in the Garden Guide is one of the quickest high-XP milestones available early.
- Pets, plants, and mini achievements all count. The Garden Guide tracks achievements across pets, plants, trading, and exploration. Players who focus only on harvesting miss the XP from pet-based achievements, seed pack opens, and daily quest completions that each carry their own milestone rewards.
- Season Pass quests reset at midnight server time. Logging in just after reset to do that day’s quests immediately ensures no Pass Points are missed on any given day.
Garden Guide Level Rewards at Key Milestones
| Garden Level | Notable Reward |
|---|---|
| Level 5 | Normal Seed Pack |
| Level 10 | Gardener Seed Pack |
| Level 20 | 100 Backpack Slots |
| Level 25 | Exotic Seed Pack |
| Level 30 | Exclusive fence skin variant |
| Level 40 | Advanced fence reward |
| Level 50 | Golden Fence skin (top cosmetic milestone) + Statue of Achievement |
System 2: Pet Age and Pet XP Leveling (The Highest-Volume Search Topic)
Pet leveling is the most searched sub-topic under this keyword for a clear reason: reaching Age 50 unlocks the Mutation Machine, and reaching Age 100 unlocks a permanent extra pet slot. Both milestones are significant enough that players actively plan their setups around reaching them faster. Without optimization, getting a single pet to Age 50 can take 69 days. With the right setup, it comes down to 5 to 10 days. Here is exactly how that works.
How Pet XP and Pet Age Actually Work
Every pet in the game has an independent age counter that increases as it accumulates XP. The base passive XP rate for a pet with a full hunger bar is approximately 1 to 2 XP per second. An empty hunger bar gives zero XP. Not slower. Zero. Every hour of empty hunger is permanently lost leveling time. See our guide on best ways to farm battle XP in Grow a Garden.
The game uses the word ‘age’ rather than ‘level’ for pets. When guides, players, or the game itself refer to pet level 50, they mean pet Age 50. The terms are used interchangeably in the community but the in-game UI displays it as age.
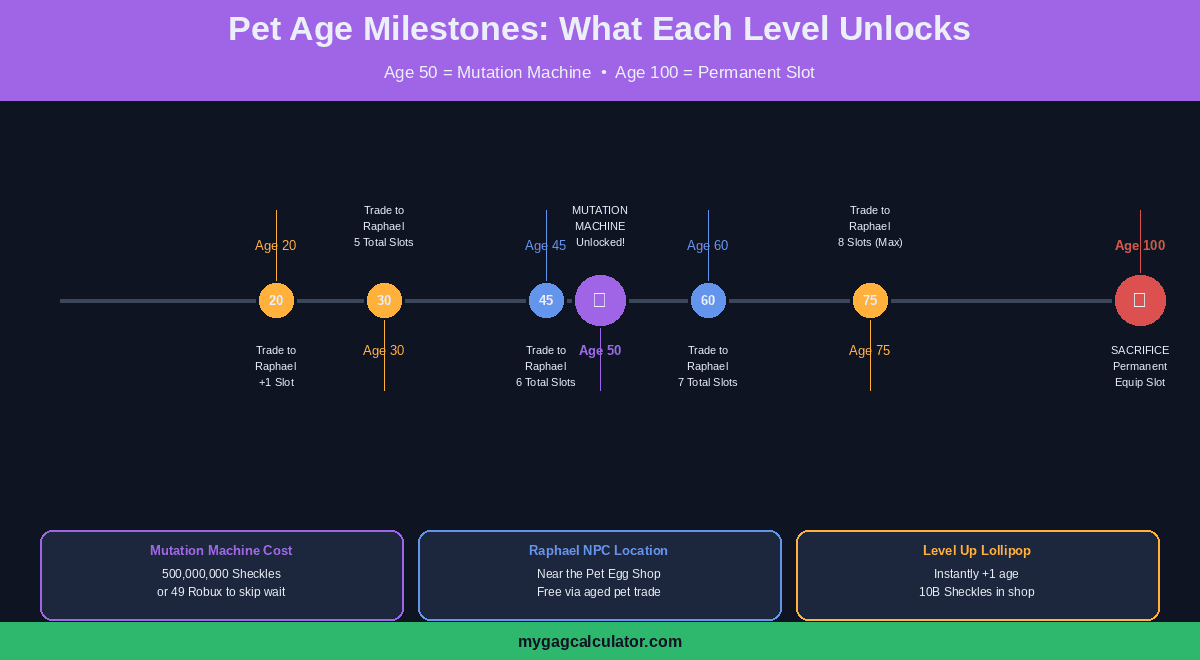
| Pet Age Milestone | What It Unlocks |
|---|---|
| Age 20 | Eligible to trade to Raphael NPC for +1 pet slot (or 249 Robux) |
| Age 30 | Eligible to trade to Raphael NPC for 5 total pet slots |
| Age 45 | Eligible to trade to Raphael NPC for 6 total pet slots |
| Age 50 | Mutation Machine access: spend 500,000,000 Sheckles to apply a pet mutation |
| Age 60 | Eligible to trade to Raphael NPC for 7 total pet slots |
| Age 75 | Eligible to trade to Raphael NPC for 8 total pet slots (max) or 1,699 Robux |
| Age 100 | Sacrifice pet to Raphael to permanently unlock an extra pet equip slot |
The Number One Rule: Keep the Hunger Bar Full
Before any XP setup matters, the hunger bar has to stay filled. A pet’s hunger bar depletes over approximately 12 hours. After it hits zero, XP gain stops completely. Setting a real-world reminder to log in every 10 to 12 hours specifically to refill pet hunger is the single highest-impact habit for faster pet leveling.
Feeding options:
- Medium Pet Treats from the shop: quick and reliable.
- Large harvested fruits like Burning Bud, Sugar Apple, or Horned Dinomushroom: larger fruit weight fills the hunger bar faster than small or low-weight fruits. An epic or legendary-weight fruit fills it in one feed.
- Moth pet: automatically feeds nearby pets every 10 minutes when placed in the garden. For fully AFK setups, the Moth removes the hunger problem entirely by handling feeding automatically.
- Capybara pet: prevents hunger loss for pets within its proximity radius. Pets inside a Capybara’s aura do not lose hunger over time, meaning they never need manual feeding while the Capybara is active.
All XP Booster Pets in Grow a Garden (2026 Complete List)
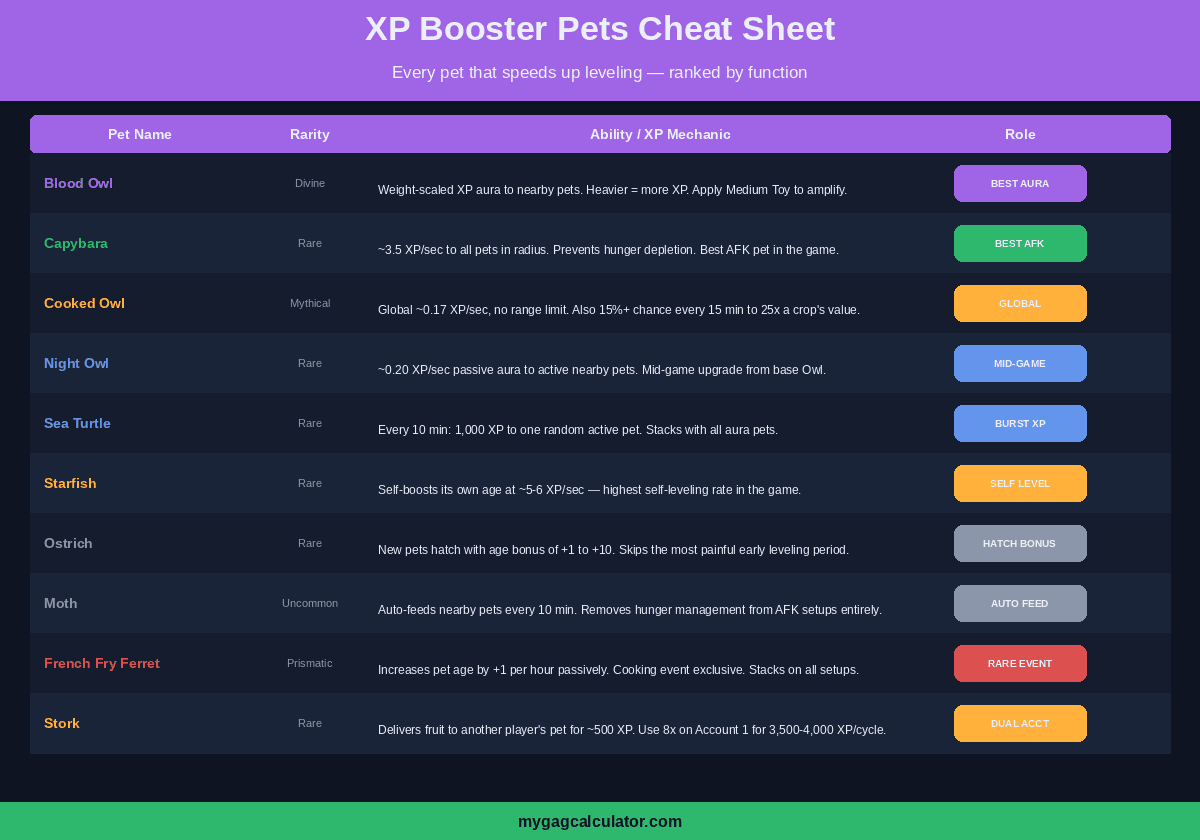
Not all pets level at the same speed, and not all contribute to other pets’ XP. The table below covers every pet that meaningfully affects XP gain, organized by type.
| Pet | Rarity | XP Mechanic | XP Rate / Notes |
|---|---|---|---|
| Owl | Common | Passive XP aura to nearby pets | Baseline entry-level XP booster. Always useful. |
| Night Owl | Rare | Stronger passive XP aura to active pets | Approx. 0.20 XP per second to nearby pets. Mid-game upgrade from base Owl. |
| Cooked Owl | Mythical | Global passive XP drip to all active pets, no range requirement | Approx. 0.17 XP/sec globally. Also has a 15%+ chance every 15 minutes to multiply a crop’s value by up to 25x. Best combined with Blood Owl. |
| Blood Owl | Divine | Highest Owl-tier XP aura, weight-scaled | XP output scales with the Blood Owl’s own weight. Heavier (older) Blood Owls give more XP. End-game leveling pet. |
| Capybara | Rare | Area-of-effect XP to all nearby pets + prevents hunger loss in radius | Approx. 3.5 XP per second to all pets within range. Also keeps hunger bars from depleting. Best AFK pet in the game for leveling. |
| Sea Turtle | Rare | Every 10 minutes, grants 1,000 XP to one random active pet | Stacks with Owls and Capybara. Originally from the Rare Summer Egg at 20% hatch rate, tradeable. |
| Starfish | Rare | Self-XP booster, highest self-leveling rate | Generates approx. 5 to 6 XP per second for itself. Best for players targeting one specific pet for rapid leveling. |
| Ostrich | Rare | Pets hatched from eggs start with an age bonus of 1 to 10 | Does not generate live XP but removes the most painful early leveling period from new pets. Stacks with other boosters. |
| Iguanodon | Legendary | Active Dinosaur-type pets gain additional XP per second | Specialist pet for Dino-type leveling setups (Dilophosaurus, etc.). Not useful outside that category. |
| Nihonzaru | Rare | Passive XP contribution to nearby pets | Similar role to Night Owl. Part of mid-game XP support setups. |
| Queen Bee | Divine | Resets cooldowns on other pets’ abilities | Cycles XP pet abilities faster, effectively increasing the rate of ability-based XP triggers. Synergizes with timed-ability XP pets. |
| French Fry Ferret | Prismatic (Cooking Event) | Increases pet age by 1 level per hour passively | Prismatic rarity, exclusive to the cooking event. Stacks on top of all other XP boosters. |
| Stork | Rare (Event) | Delivers a fruit from your garden to another player’s pet, granting that pet approx. 500+ XP per delivery | Used in a dual-account private server setup. Account 1 runs 8 Storks (or 1 Peacock + 7 Storks). Account 2 receives all XP on the target pet. Yields 3,500 to 4,000 XP per cycle. Best for early game when rarer XP pets are not yet available. |
How the Stork Method Works (Dual Account Setup)
The Stork pet is one of the most discussed leveling discoveries of 2026. It works differently from all other XP pets: instead of boosting the player’s own pets, the Stork picks up a fruit from the garden every few minutes and delivers it to another player’s pet, granting approximately 500 or more XP to the receiving pet per delivery.
The reliable way to use Stork is through two accounts in a private server:
- Account 1 (Support account): Place 8 Storks, or combine 1 Peacock with 7 Storks. This account sends all the XP deliveries.
- Account 2 (Target account): Place only the pet to be leveled. All Stork deliveries from Account 1 land on this pet.
In public servers, Stork XP goes to random players, making it unreliable. In a controlled private server, the setup consistently generates 3,500 to 4,000 XP per cycle. This is a significant early-game boost that does not require rare pets to execute.
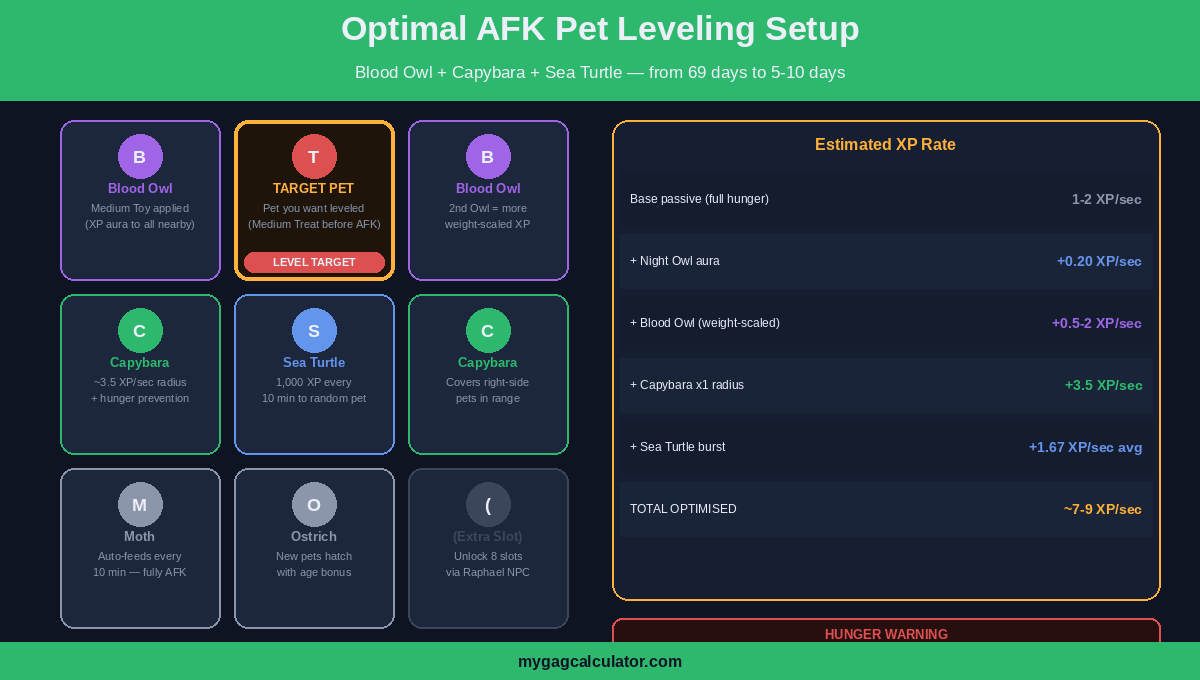
The Optimal AFK Pet Leveling Setup
For players who want the highest possible passive XP rate while away from the game,. You canc use our pet leveling calculator for accurate calculations. The following setup is the current best combination:
- 1 Blood Owl placed directly next to the target pet. Provides the highest weight-scaled XP aura. Apply a Medium Toy to the Blood Owl to amplify its passive ability.
- 1 to 2 Capybaras covering the garden area. Each provides approx. 3.5 XP per second to all pets within range and prevents their hunger from depleting. On a small garden layout, one Capybara covers the entire active area.
- 1 Sea Turtle for the random 1,000 XP injection every 10 minutes. Stacks additively with both the Owl aura and Capybara aura.
- 1 Moth to handle automatic feeding every 10 minutes if not using a Capybara for hunger prevention.
- Apply a Medium Treat to the target pet before leaving. This fills its hunger bar and, combined with Capybara’s hunger prevention, ensures XP never stops accumulating.
- Plant slow-cycle crops (Corn, Pumpkin, Watermelon) in the background to keep the garden active and generating Sheckles passively.
| Proven Leveling Times
No XP optimization: approximately 69 days to reach Age 50. Blood Owl + Capybara AFK setup: 5 to 10 days depending on feeding consistency. Blood Owl + Capybara + Sea Turtle + active toy use: under 5 days. Advanced god combo (Starfish + stacked Capybaras + Blood Owl): under 3 days. Stork dual-account method: can push a single target pet to high levels extremely fast in early game. |
Pet Slots: Unlocking More via Raphael NPC
Every player starts with 3 active pet slots. More slots mean more XP booster pets running simultaneously, which compounds XP gain significantly. The Raphael NPC near the Pet Egg shop handles pet slot upgrades via two paths:
| Method | Requirement | Result |
|---|---|---|
| Trade aged pet to Raphael (free) | Pet Age 20: hold it and select ‘I want to sell my pet’ | Unlocks 4th slot permanently |
| Trade aged pet to Raphael (free) | Pet Age 30 | Unlocks 5th slot (total: 5) |
| Trade aged pet to Raphael (free) | Pet Age 45 | Unlocks 6th slot (total: 6) |
| Trade aged pet to Raphael (free) | Pet Age 60 | Unlocks 7th slot (total: 7) |
| Trade aged pet to Raphael (free) | Pet Age 75 | Unlocks 8th slot (max, total: 8) |
| Robux purchase | 249 Robux for +1 slot, up to 1,699 Robux for all 5 extra slots | Same result as free path but instant |
| Sacrifice at Age 100 (free) | Pet reaches Age 100 | Permanent extra equip slot (different from active slots) |
Running 8 active pet slots rather than 3 allows a player to have the target pet, 2 Blood Owls, 2 Capybaras, 1 Sea Turtle, 1 Moth, and 1 Ostrich all active simultaneously. That setup covers every XP boosting mechanism in the game at once and is the current meta for fastest pet leveling. See full guide on all NPCs in Grow a Garden.
Pet Toys, Treats, and the Level Up Lollipop
Pet Toys crafted at the crafting table or purchased from the Gear shop boost a pet’s happiness, which contributes to XP gain rate. The key insight that most guides miss: applying a Small Toy or Medium Toy to the XP booster pets, not just the target pet, amplifies their aura effectiveness. A Blood Owl with a Medium Toy gives more XP per second than one without.
The Level Up Lollipop is a premium item that instantly increases a pet’s age by 1. At 10,000,000,000 Sheckles in the shop (or available through event rewards), it is expensive. The best use case is pushing a pet sitting at Age 49 or Age 99 over the threshold to unlock the Mutation Machine or permanent slot sacrifice immediately, rather than waiting for the final day of passive leveling.
The Pet Mutation Machine: What Happens at Age 50
The Mutation Machine is located on the north side of the map near the Pet Egg shop. To use it, a pet must have reached Age 50 minimum. The cost is 500,000,000 Sheckles, or 49 Robux to skip the 60-minute wait timer. Using the Machine resets the pet back to Age 1 and applies a random mutation from the following tier list:
| Pet Mutation | Rarity | Effect / Notes |
|---|---|---|
| Shiny | Common | +15% XP gain for the mutated pet. Stacks with Owl auras. |
| Shocked | Uncommon | Electrical-themed bonus ability |
| Jumbo | Rare | Increases pet size |
| Mega | Rare | Further size increase beyond Jumbo |
| Rainbow | Rare | Visual rainbow effect + enhanced abilities |
| Nightmare | Legendary (S-tier) | The most sought-after combat/farming mutation. Highly valuable in trades. |
| Dreadbound | Legendary | XP multiplier on specific ability triggers |
| Ascended | Divine (0.32% chance) | Rarest pet mutation, extremely high trade value |
| Dawnbound | Divine | 150x crop value multiplier interaction when paired correctly |
Pet mutation results cannot be chosen in advance. The 0.32% chance on Ascended means most players will need multiple Mutation Machine uses to hit it. To evaluate the trade value of any mutated pet before selling or exchanging it, the Grow a Garden Pet Calculator gives a current value estimate based on mutation type, age, and rarity.
System 3: Farm Progression and Sheckle Scaling (Beginner to Advanced)
Garden Guide XP and pet leveling both require Sheckles as fuel. Better sprinklers, pet treats, eggs, and seeds all cost Sheckles. Farm progression is not a separate leveling system so much as the economic engine that powers the other two. Getting this right early makes everything else faster.
Beginner Crop Strategy: Which Seeds to Start With
New players start with 20 Sheckles and a 3×2 plot. The goal in the first few sessions is volume of harvests, not crop rarity.
| Stage | Best Crops | Why |
|---|---|---|
| First day (0-500 Sheckles) | Carrot, Blueberry | Fast growth cycles, multi-harvest (no replanting), generates Garden Guide harvest achievements quickly |
| Early game (500-10M Sheckles) | Blueberry, Bamboo, Mushroom, Strawberry | Multi-harvest crops compound fast, Bamboo and Mushroom have solid per-harvest Sheckle values for their speed |
| Mid game (10M-500M Sheckles) | Pepper (Rare), Grape (Divine multi-harvest), Sunflower, Coconut | Higher base values, longer grow cycles but better Sheckle-per-hour ratios |
| Late game (500M+ Sheckles) | Rare event seeds, mutation-farmed plots | Focus shifts to mutation stacking rather than volume. One Abyssal-mutated Maple Resin harvest can exceed thousands of standard harvests. |
For planning exactly which seeds to plant given a current Sheckle budget and plot size, the Grow a Garden Crop Planner calculates expected Sheckle output per hour for any combination of crops and growth conditions.
Gear Progression: Sprinkler Upgrade Order
Manually watering crops plot by plot is the single biggest time sink in early farm progression. Upgrading the Watering Can to an area sprinkler as quickly as possible compounds harvest frequency without additional active effort.
- Start with the Basic Watering Can (starter gear). Use it until Advanced Sprinkler is affordable.
- Advanced Sprinkler: first major upgrade. Covers multiple plots automatically. Priority purchase.
- Godly Sprinkler: next step. Larger coverage radius, faster water cycling per plot.
- Master Sprinkler: covers a broad area. At this stage, a full garden plot can run almost entirely passively.
- Grandmaster Sprinkler: top-tier gear. Equivalent coverage radius to the event Maple Sprinkler. Endgame purchase.
Fertilizers also compound crop value: Silver Fertilizer adds mutation chance, Gold Fertilizer boosts value multipliers, and Rainbow Fertilizer applies the highest-tier fertilizer bonus. These become meaningful once the base Sheckle income is high enough that the fertilizer cost-per-harvest makes sense.
Mutation Farming: How Crop Mutations Scale Sheckle Income
Crop mutations are modifiers that multiply the sell value of a harvest. They stack with each other, meaning a crop can carry multiple mutations simultaneously and their multipliers compound. Understanding which mutations to target is one of the fastest ways to accelerate overall progression. The complete mutations guide covers every mutation in the game, but the key ones for Sheckle scaling are:
| Mutation | Trigger | Multiplier |
|---|---|---|
| Wet | Rain weather event | 2x |
| Chilled | Snow weather event | 2x |
| Windstruck | Wind weather event | 3x |
| Electrified | Thunderstorm event | 5x |
| Shocked | Thunderstorm event (rarer proc) | 100x |
| Gold | Chance during active growing | 20x |
| Rainbow | Rare passive proc or Rainbow Fertilizer | 50x |
| Bloodlit | Blood Moon weather event | Multiplier varies by stack |
| Abyssal | Eclipsed + Voidtouched on same crop | 240x |
| Voidtouched | Space Squirrel pet (15% per 17.5 min) or Black Hole admin event | 135x |
| Celestial | Celestial weather event | High multiplier, event-dependent |
| Dawnbound | Dawnbound mutation + compatible trigger | 150x base interaction |
Mutations stack. A crop with Wet (2x), Shocked (100x), and Rainbow (50x) simultaneously does not add those values; it multiplies them together. The theoretical ceiling of 2,880,000x or higher from maximal mutation stacking on a high-rarity crop is what players reference when describing endgame harvest values.
AFK farming during weather events, particularly blood moon and thunderstorm cycles, passively applies Shocked and Bloodlit mutations overnight without any active input. The Grow a Garden Weather Tracker shows upcoming weather events in real time, allowing farmers to schedule AFK sessions around the most valuable mutation windows. For calculating what any crop is worth with a given mutation stack, the Grow a Garden Mutation Calculator gives an instant Sheckle value estimate.
Plot Expansion and the Friends Bonus
Expanding garden plots gives more planting space, which means more harvests per cycle and more Garden Guide achievement progress. The expansion shop NPC handles land upgrades and each tier costs progressively more Sheckles. Prioritizing early plot expansion over fancy seeds gives more harvest cycles per hour, which compounds everything else.
Playing with friends who are in the same server gives a 10% Sheckle bonus on all sales. This compounds meaningfully over long sessions and is worth coordinating for dedicated farming runs. Private servers with a trusted group keep the bonus consistent across an entire session.
Event Quests: Bonus XP Opportunities During Seasonal Events
Seasonal events in the game add a third quest loop on top of daily quests and Garden Guide achievements. Event quest NPCs typically appear in the central area of the map and offer three quests that reset up to three times daily during the event window. Completing event quests rewards event-specific currency and Garden XP simultaneously.
Notable events that offered strong XP and progression bonuses include the Fall Market (Fall Activities quests giving Fall Energy toward Grandmaster Sprinkler and Maple Resin rewards), the Beanstalk Event (achievements tied to bloom contributions), and the Prehistoric Event (dinosaur-themed quests rewarding seed packs).
Admin Abuse sessions, which happen roughly once per week where the developers spawn rare content directly in the game, also offer indirect progression boosts. Rare seeds obtained during Admin Abuse can jumpstart mid-game Sheckle scaling significantly. For timing and mutation value during these sessions, the Profit Calculator and Trade Calculator help evaluate whether an admin-dropped seed is worth keeping or trading for Sheckle liquidity.
Mistakes That Are Quietly Slowing Down Progression
- Letting pet hunger hit zero during AFK sessions. This is the most common and most damaging habit. Set a phone alarm for every 10 to 12 hours. The Moth or Capybara eliminate this problem entirely for players who have access to them.
- Ignoring the Garden Guide Achievements tab. Free Garden XP is sitting there at every login. Five minutes of checking which achievements are near completion is worth more than an hour of unguided farming.
- Skipping Season Pass daily quests. Six quests per day takes less than an hour. Missing three days in a season is equivalent to missing a full tier of rewards.
- Planting only rare or expensive crops for XP. Crop rarity does not scale Garden XP per harvest. Carrot harvests give the same XP tick as a Divine crop harvest. Volume and harvest frequency win in the early and mid game.
- Using the Red Fox as an XP booster. The Red Fox hops into neighboring gardens every 8 to 9 minutes and collects random seeds. It gives zero pet XP. Players who slot it expecting an Owl-like aura are losing leveling time. Slot an Owl or Sea Turtle instead.
- Not applying toys to the Blood Owl. Applying a Medium Toy to the XP booster pet, not just the target, amplifies the aura output. Most guides only mention treats on the target pet.
- Ignoring slot expansion via Raphael. Running 8 active slots instead of 3 allows the full XP booster stack (Blood Owl, Capybara, Sea Turtle, Moth, Ostrich, target pet) to run simultaneously. The Raphael NPC free path via trading aged pets is the fastest way to expand without Robux.
- Not upgrading from the basic Watering Can. Every hour of manual watering is an hour of fewer harvest cycles. An Advanced Sprinkler pays for itself within a single session.
Can Players Level Up Fast Without Spending Robux?
Completely. Every method in this guide is achievable without Robux. The free-to-play path for each system is:
- Garden Guide XP: Complete achievements and daily quests. Zero Robux needed.
- Season Pass: The pass itself is free and has 50 tiers. Premium rewards require 749 Robux but the progression speed is identical for free players.
- Pet leveling: The Blood Owl + Capybara + Sea Turtle AFK setup uses pets obtainable through gameplay, eggs, and trading. No Robux required. Slot expansion via Raphael is free using aged pets.
Robux accelerates slot expansion (buying all 5 extra slots instantly costs 1,699 Robux vs trading aged pets over time) and skips the Mutation Machine 60-minute wait (49 Robux). Those are conveniences, not gates. The highest-volume pet leveling setups in 2026 are all free-to-play.
How Pet Level Connects to Trade Value
A higher-age pet is worth more in player-to-player trades. Shorter ability cooldowns and stronger effects make aged pets more desirable to buyers who want a ready-leveled asset rather than starting from scratch. A pet at Age 40 with a Nightmare mutation from the Mutation Machine is worth multiple times what the same base pet at Age 1 commands. The Grow a Garden Pet Calculator and the Grow a Garden Trade Calculator help evaluate fair value for any pet at any age before committing to a trade. For crop value comparisons, the Profit Calculator and Weight Calculator round out the toolkit for informed decision-making on high-value exchanges.
Frequently Asked Questions
How do you level up fast in Grow a Garden?
Work all three systems simultaneously: check the Garden Guide Achievements tab and complete milestones near completion for Garden XP, finish all six daily Season Pass quests each day for Pass Points, and run a Blood Owl plus Capybara AFK setup with full pet hunger bars for Pet Age leveling. Any one of these alone is slower than running all three at once.
What gives the most XP in Grow a Garden?
For Garden Guide XP, completing high-tier achievements in the Garden Guide gives the largest single XP drops. For Pet XP, a Blood Owl combined with a Capybara (approx. 3.5 XP per second in its radius) and a Sea Turtle (1,000 XP every 10 minutes to a random pet) gives the highest passive rate available without Robux.
How do you get a pet to Age 50 fast in Grow a Garden?
Place the target pet next to a Blood Owl (with a Medium Toy applied) and a Capybara. Fill the target pet’s hunger bar with a large fruit like Burning Bud or Sugar Apple before every AFK session. Add a Sea Turtle and Moth if available. The Capybara prevents hunger from depleting and gives 3.5 XP per second to all pets in range. With this setup, Age 50 is reachable in 5 to 10 days rather than the unoptimized 69-day baseline.
Why do pets stop leveling in Grow a Garden?
An empty hunger bar stops all XP gain completely. Not slower; zero. Every hour of empty hunger is permanently lost leveling time. Feed pets with large fruits or Medium Pet Treats before every AFK session, or use a Capybara to prevent hunger from depleting, or a Moth to auto-feed every 10 minutes.
What is the best XP pet in Grow a Garden?
For passive aura XP, the Blood Owl gives the highest output (weight-scaled, so older heavier Blood Owls give more). For area coverage, the Capybara gives approximately 3.5 XP per second to all pets within range and prevents hunger loss. For burst XP, the Sea Turtle gives 1,000 XP every 10 minutes to a random active pet. The strongest setup stacks all three.
What does the Blood Owl do in Grow a Garden?
The Blood Owl provides a passive XP aura to nearby pets. The amount of XP given per second scales with the Blood Owl’s own weight, meaning older and heavier Blood Owls give more XP. Applying a Medium Toy to the Blood Owl amplifies its aura output further.
What does the Capybara do in Grow a Garden?
The Capybara gives approximately 3.5 XP per second to all pets within its proximity radius and prevents those pets’ hunger bars from depleting over time. On a compact garden layout where all pets stay within range, one Capybara effectively solves both the XP and the hunger problem simultaneously.
Who is Raphael in Grow a Garden?
Raphael is the NPC near the Pet Egg shop who handles pet slot expansion. Players can trade an aged pet (Age 20 minimum for the first slot) to Raphael to permanently unlock additional active pet slots, up to 8 total. Each slot requires a progressively older pet: Age 20 for the 4th slot, Age 30 for the 5th, Age 45 for the 6th, Age 60 for the 7th, and Age 75 for the 8th.
How do you unlock more pet slots in Grow a Garden?
Hold an aged pet (minimum Age 20 for the first upgrade), walk to Raphael near the Pet Egg shop, and select ‘I want to sell my pet.’ Each traded pet permanently unlocks one additional active pet slot. Alternatively, pet slots can be purchased with Robux (249 Robux for the 4th slot up to 1,699 Robux for all five extra slots).
What does the Level Up Lollipop do in Grow a Garden?
The Level Up Lollipop instantly increases a pet’s age by 1. At 10,000,000,000 Sheckles in the gear shop, it is expensive and best saved for pushing a pet over a critical threshold, such as Age 49 to 50 for Mutation Machine access or Age 99 to 100 for the permanent slot sacrifice, rather than using it on a pet still many levels away.
What is the Mutation Machine in Grow a Garden?
The Mutation Machine is located on the north side of the map near the Pet Egg shop. A pet must be Age 50 or older to use it. The cost is 500,000,000 Sheckles, and it resets the pet to Age 1 while applying a random mutation from the pet mutation tier list. The 60-minute wait timer can be skipped for 49 Robux.
What happens when a pet reaches Age 100 in Grow a Garden?
At Age 100, a pet can be sacrificed to Raphael to permanently unlock an extra pet equip slot (separate from the active pet slots earned through the Age 20 to 75 trading path). This is an endgame milestone that rewards long-term investment in a single pet.
How do daily quests work for the Season Pass in Grow a Garden?
Six daily quests are available per day, each awarding 250 to 400 Pass Points on completion. Quests reset every 24 hours. Completing all six consistently across the season length is the main free-to-play path to reaching Tier 50 of the Season Pass.
Can free players max the Season Pass in Grow a Garden?
Yes. The Season Pass itself is free and all 50 tiers are accessible without spending Robux. The premium version (749 Robux) adds extra tier rewards including exclusive seeds and mutated pets, but does not change the speed of progression. Free players who complete daily quests consistently can reach Tier 50 within a normal season window.
What is the Stork pet used for in Grow a Garden?
The Stork picks up a fruit from the garden every few minutes and delivers it to another player’s pet, granting approximately 500+ XP to the receiving pet. In a dual-account private server setup with 8 Storks on one account sending XP to a single target pet on the second account, players achieve 3,500 to 4,000 XP per cycle. This is an effective early-game leveling method that does not require rare pets.
Does playing with friends give a bonus in Grow a Garden?
Yes. Having friends in the same server grants a 10% Sheckle bonus on all crop sales. Coordinating with a trusted group in a private server maintains this bonus for the full session, which compounds meaningfully over long farming runs.
What crops are best for beginners leveling up in Grow a Garden?
Carrot and Blueberry are the best starting crops. Both grow fast, Blueberry is multi-harvest (no replanting), and the volume of harvests quickly completes early Garden Guide achievements for Garden XP. Bamboo and Mushroom are strong mid-early additions for Sheckle income without requiring rare seeds.
Conclusion: Work All Three Systems at Once
Leveling fast in Grow a Garden is not about grinding one thing harder. It is about recognizing that Garden Guide XP, Season Pass tiers, and Pet Age are three separate fuel tanks that all need to be filled at the same time.
Check the Garden Guide Achievements tab every login. Do the six daily Season Pass quests before anything else. Keep pet hunger bars full and run a Blood Owl with a Capybara. Upgrade the Watering Can to an area sprinkler as the first Sheckle spend. AFK during weather events for free crop mutations overnight.
Lock in those habits and progression will feel completely different within a few days. For live crop values, mutation math, pet trade checks, and profit planning, the tools at mygagcalculator.com are built specifically for Grow a Garden players at every stage: Mutation Calculator, Profit Calculator, Crop Planner, Pet Calculator, and Weather Tracker are all free to use.